

This week we are learning about Romania and I wanted to find a craft to tie into our studies. I searched online for Romanian crafts ideas and pictures of leaf print eggs caught my attention. The eggs are dyed in natural dyes (which also tied in nicely with our medieval studies) and finding the little flowers, ferns, and tiny leaves to imprint on our eggs added to this week’s nature studies. Multi-subject lessons are the best! I’m not sure how Romanian these eggs are but they were fun to make and they are absolutely beautiful.
Just a few words to keep things real, this project was time consuming. From boiling the eggs, preparing the natural dyes, patience with the egg designs and waiting for the colors to come through, and the mess (oh, the mess!! see end of post) this is not your average-throw-a-color-tablet-in-a-cup-of-vinegar-and-add-an-egg type of thing. BUT if you are adventurous and like a good creative-challenge, this project is for you!!! (And my four year old stayed with us and enjoyed the project the whole time, so if he can do it…..)
Materials:
- white eggs (hardboiled)
- tumeric
- beets
- coffee
- red cabbage
- white vinegar
- water
- nylon knee highs
- small hair elastics
- small flowers, leaves, clovers
- papertowels
Directions:
1.) Boil the eggs and keep in the refrigerator until ready to use.
2.) Search outside for small flowers, interesting leaves, ferns, and clovers. Cilantro and celery leaves would also work.
2.) Make the natural dyes. I followed Martha Stewart’s directions for dying eggs naturally.


3.) Decorate the eggs. We noticed the condensation on the eggs (from being in the refrigerator) helped the leaves and petals stick better. If the eggshells were dry, we added a little moisture to the leaves to help keep things in place. This cut down on frustration levels for those with little hands. 🙂
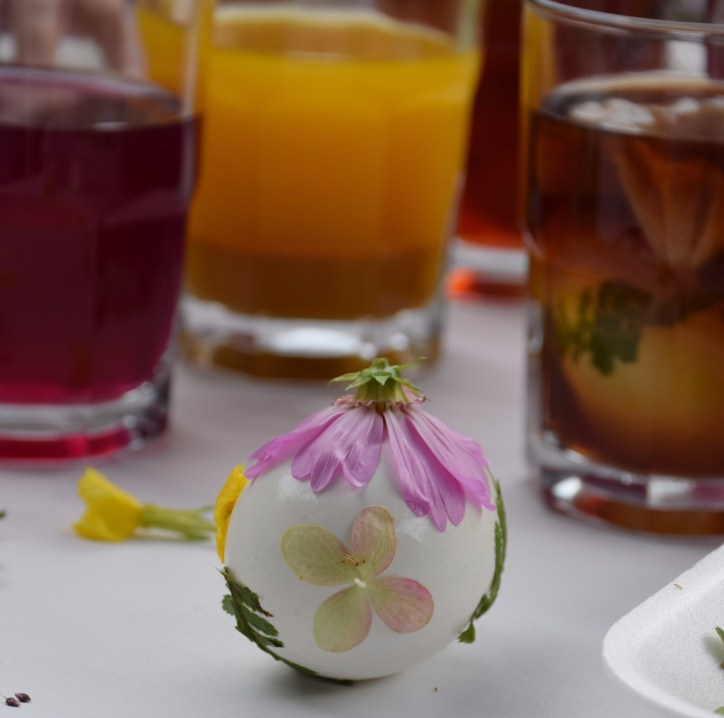

4.) Cover decorated egg with nylon. The foot of a knee high works great but since we only had two per package, we had to create our own “foot” with an extra small elastic. Pull nylon tightly around the egg to hold things in place.

5.) Give the eggs a natural dye bath. The longer the eggs soak, the more vibrant the color. We left the eggs in the dye for a minimum of an hour. See Martha Stewart’s directions for time and color suggestions.


6.) Cut off the nylon and peel off leaves and flowers. (We patted the egg dry with a paper towel before we cut the nylon. I am not sure if this make a difference in color but it made the eggs less slippery to work with.)

7.) Observe and enjoy!!!


And the promised TRUTH…(BUT it was worth it!!!)


