This month, the kids and I are studying gardening. Although it’s not warm enough to plant outside in New Hampshire just yet, we are learning and preparing for next month when we can. We’ll be covering all things seeds, soils, sustainability, and much more. My plan is to update this post throughout the month sharing the resources, books and the creative activities we will be using.
There is a sticky milkweed patch that grows by the side of our house. All summer long it grows and grows and hosts a variety of pests. Wasps, spiders, flies, aphids, beetles- the so-called ickiest of invertebrates and arthropods. There is only one reason I will not let my husband “deal” with the plants -the monarch butterfly.
Year after year, the monarch butterflies return to our patch to deposit their tiny, cone-shaped eggs on the underside of the leaves. For years, I have assumed the eggs successfully hatch into feasting caterpillars. Healthy caterpillars who eat and eat, grow and grow before enclosing themselves into a beautiful chrysalis, and then finally emerging into butterflies. I hadn’t given much thought to the whole process other than we were doing a good job keeping the milkweed there and the beautiful monarch kept returning and visiting.
At the end of August, I stumbled across some information about the monarch butterfly population declining and the fact that only 10% of monarchs make it from egg to adult in the wild. I read about people collecting the eggs, raising the caterpillars. and then releasing the butterflies in hopes of helping the monarch population to return and increase.
In previous years, I have raised painted lady butterflies in classrooms and in homeschool lessons. I knew a good amount about process of metamorphosis but only witnessed it with painted lady butterflies. And with painted lady butterflies, the caterpillars are purchased online and then come in little containers with an all you they eat buffet! Raising monarchs from eggs found outside was a different thing.
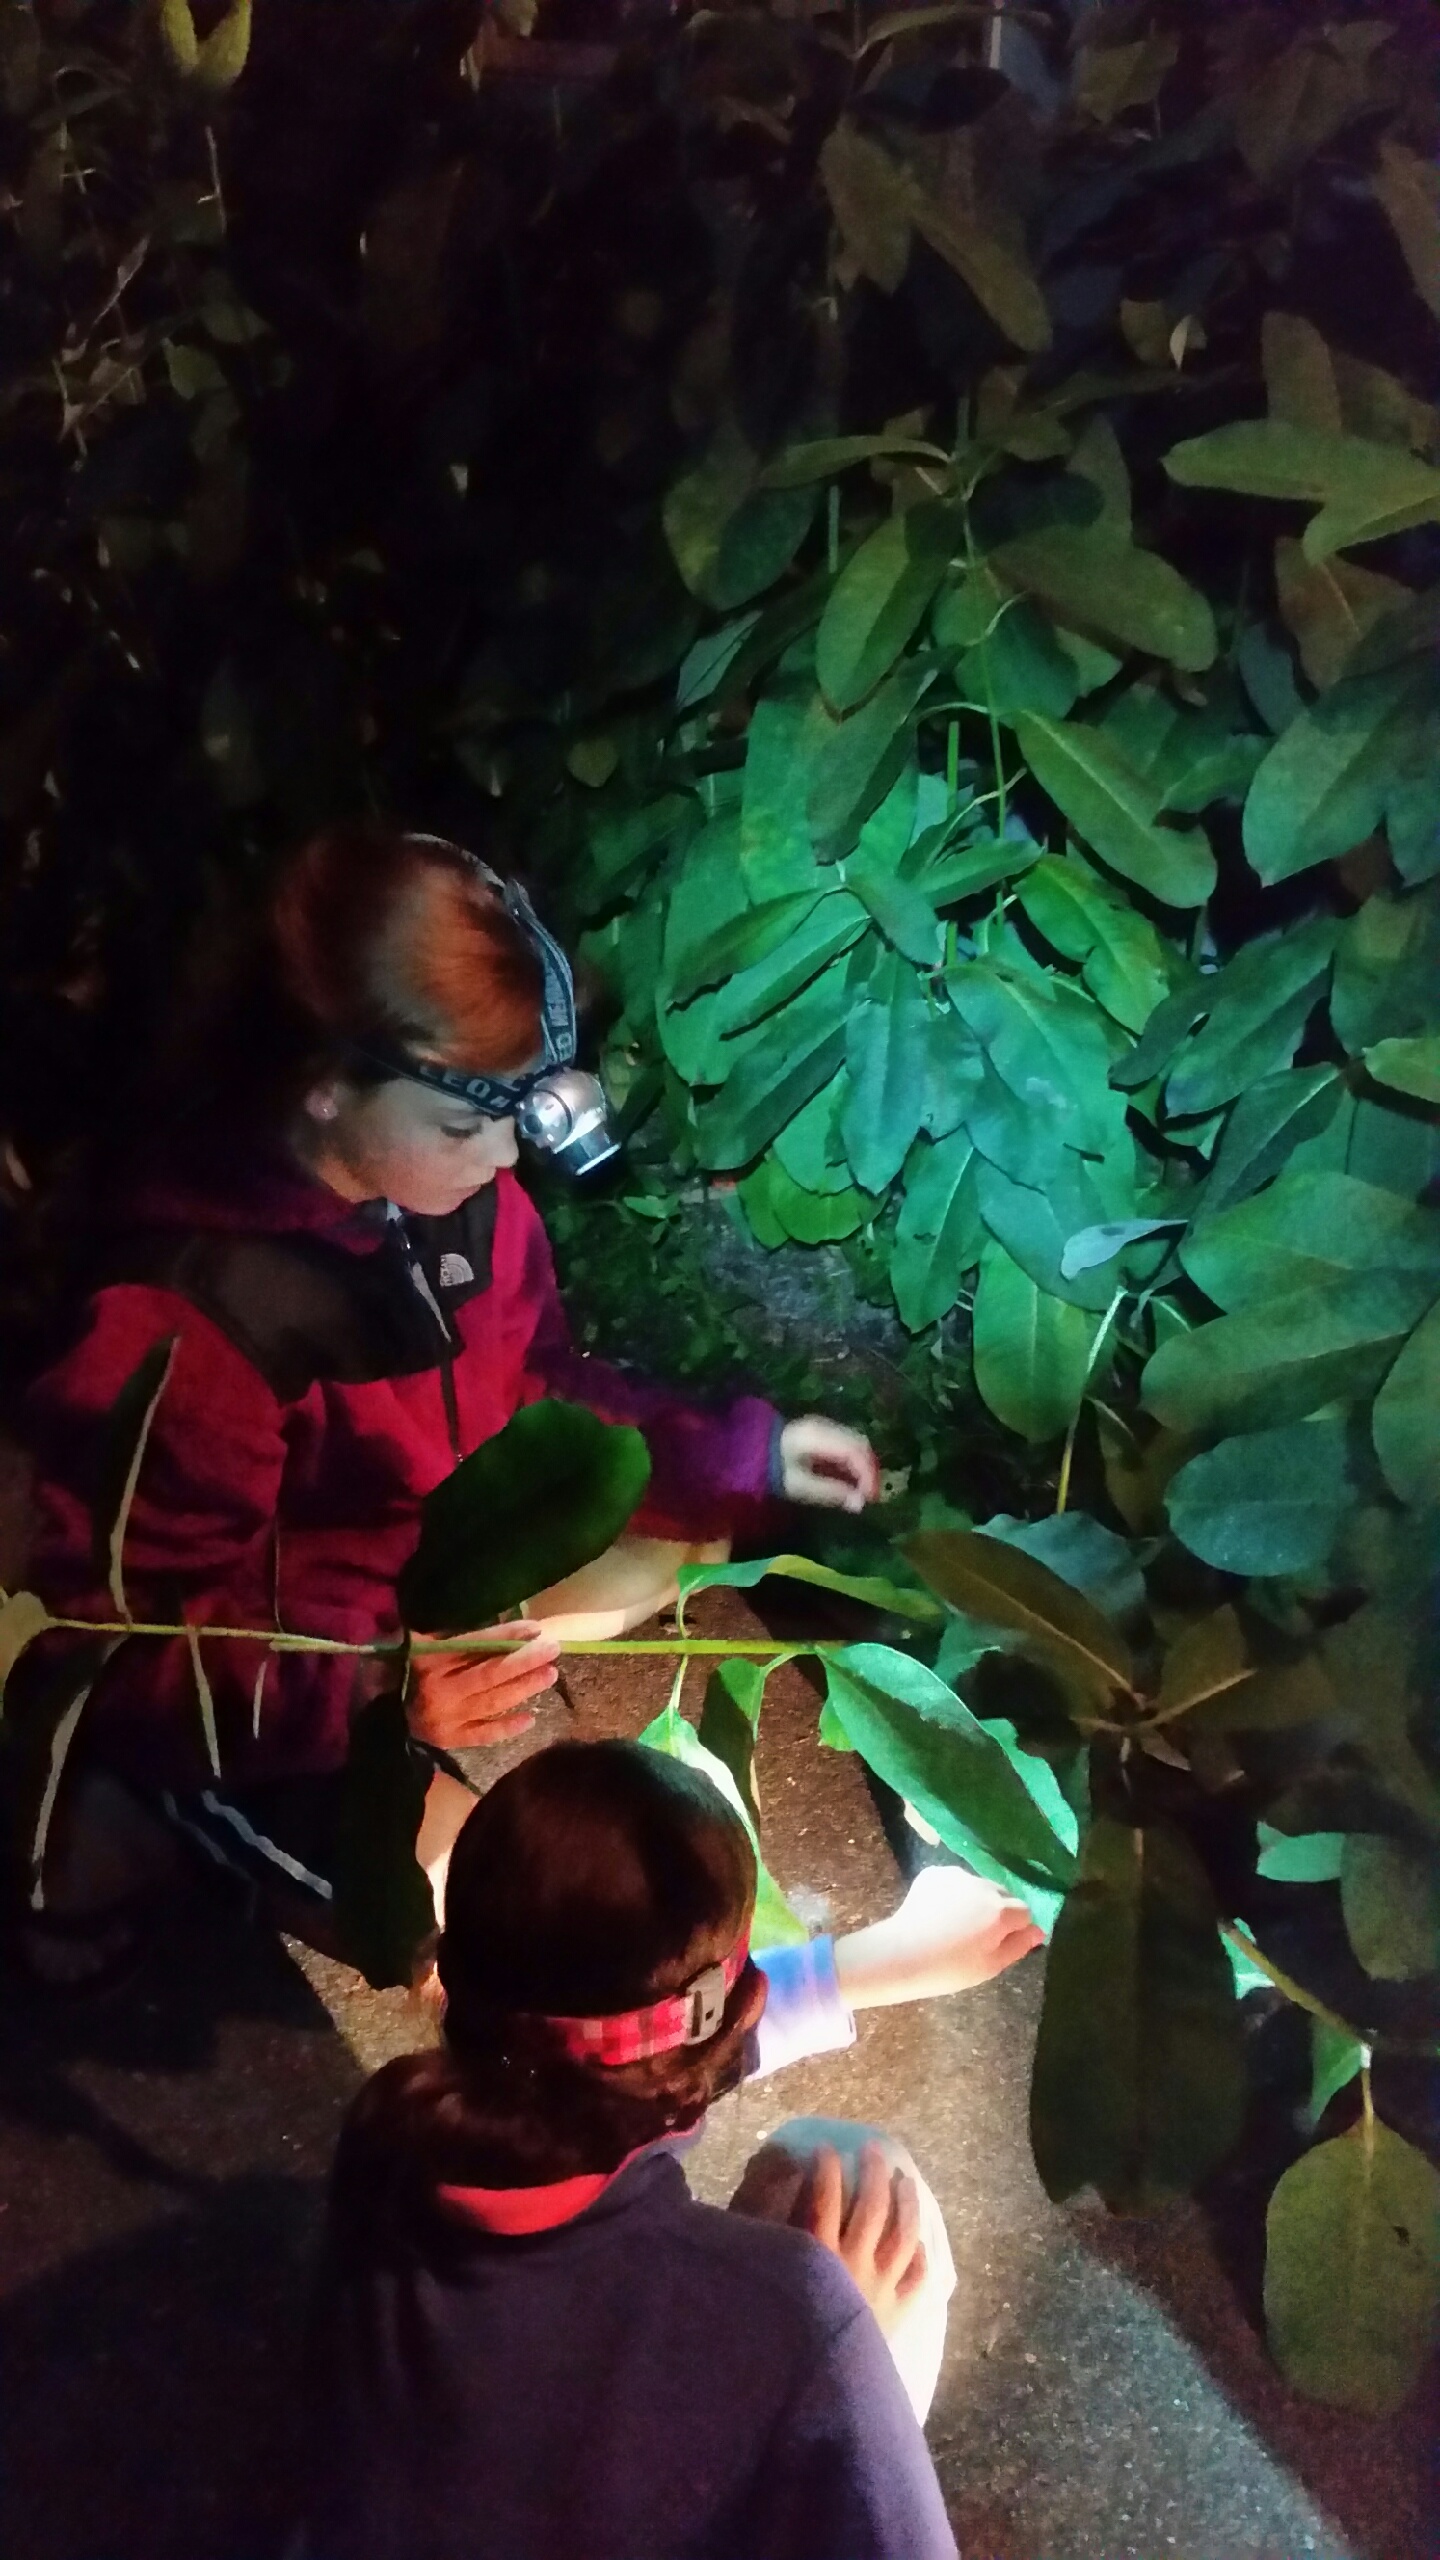
But, I was curious. Could we too raise monarchs successfully from egg to adult? Could we play a part in helping the monarch population increase? Since introduced with new knowledge, every time I walked by our milkweed patch after that, I looked at the milkweed plants in a different way. I noticed more and more caterpillar bite marks on the leaves and then a local naturalist pointed out some monarch eggs. He advised us to check the plants at night to see if we could find any caterpillars. The first night we went out caterpillar hunting we were successful. Not only did we find eggs and we also found one tiny caterpillar. We brought it in with the leave it was munching and placed it into our mesh butterfly habitat (the one we used with the painted lady butterflies.) Then we hoped for the best. Unfortunately, our hopes were met with sadness, even with the best researched care, the caterpillar died a few days later.
It was easier for us to see the butterfly eggs and the caterpillar activity at night.
First caterpillar found- RIP Little One
We did not want to give up. Over the next couple of days, we went out again, collecting five eggs. In my research, I had learned that caterpillars eat A LOT of milkweed. The experts advised to be intentional not to take any more eggs than caterpillars you could feed. Looking at our milkweed patch, there was only so much fresh and new leaves available.
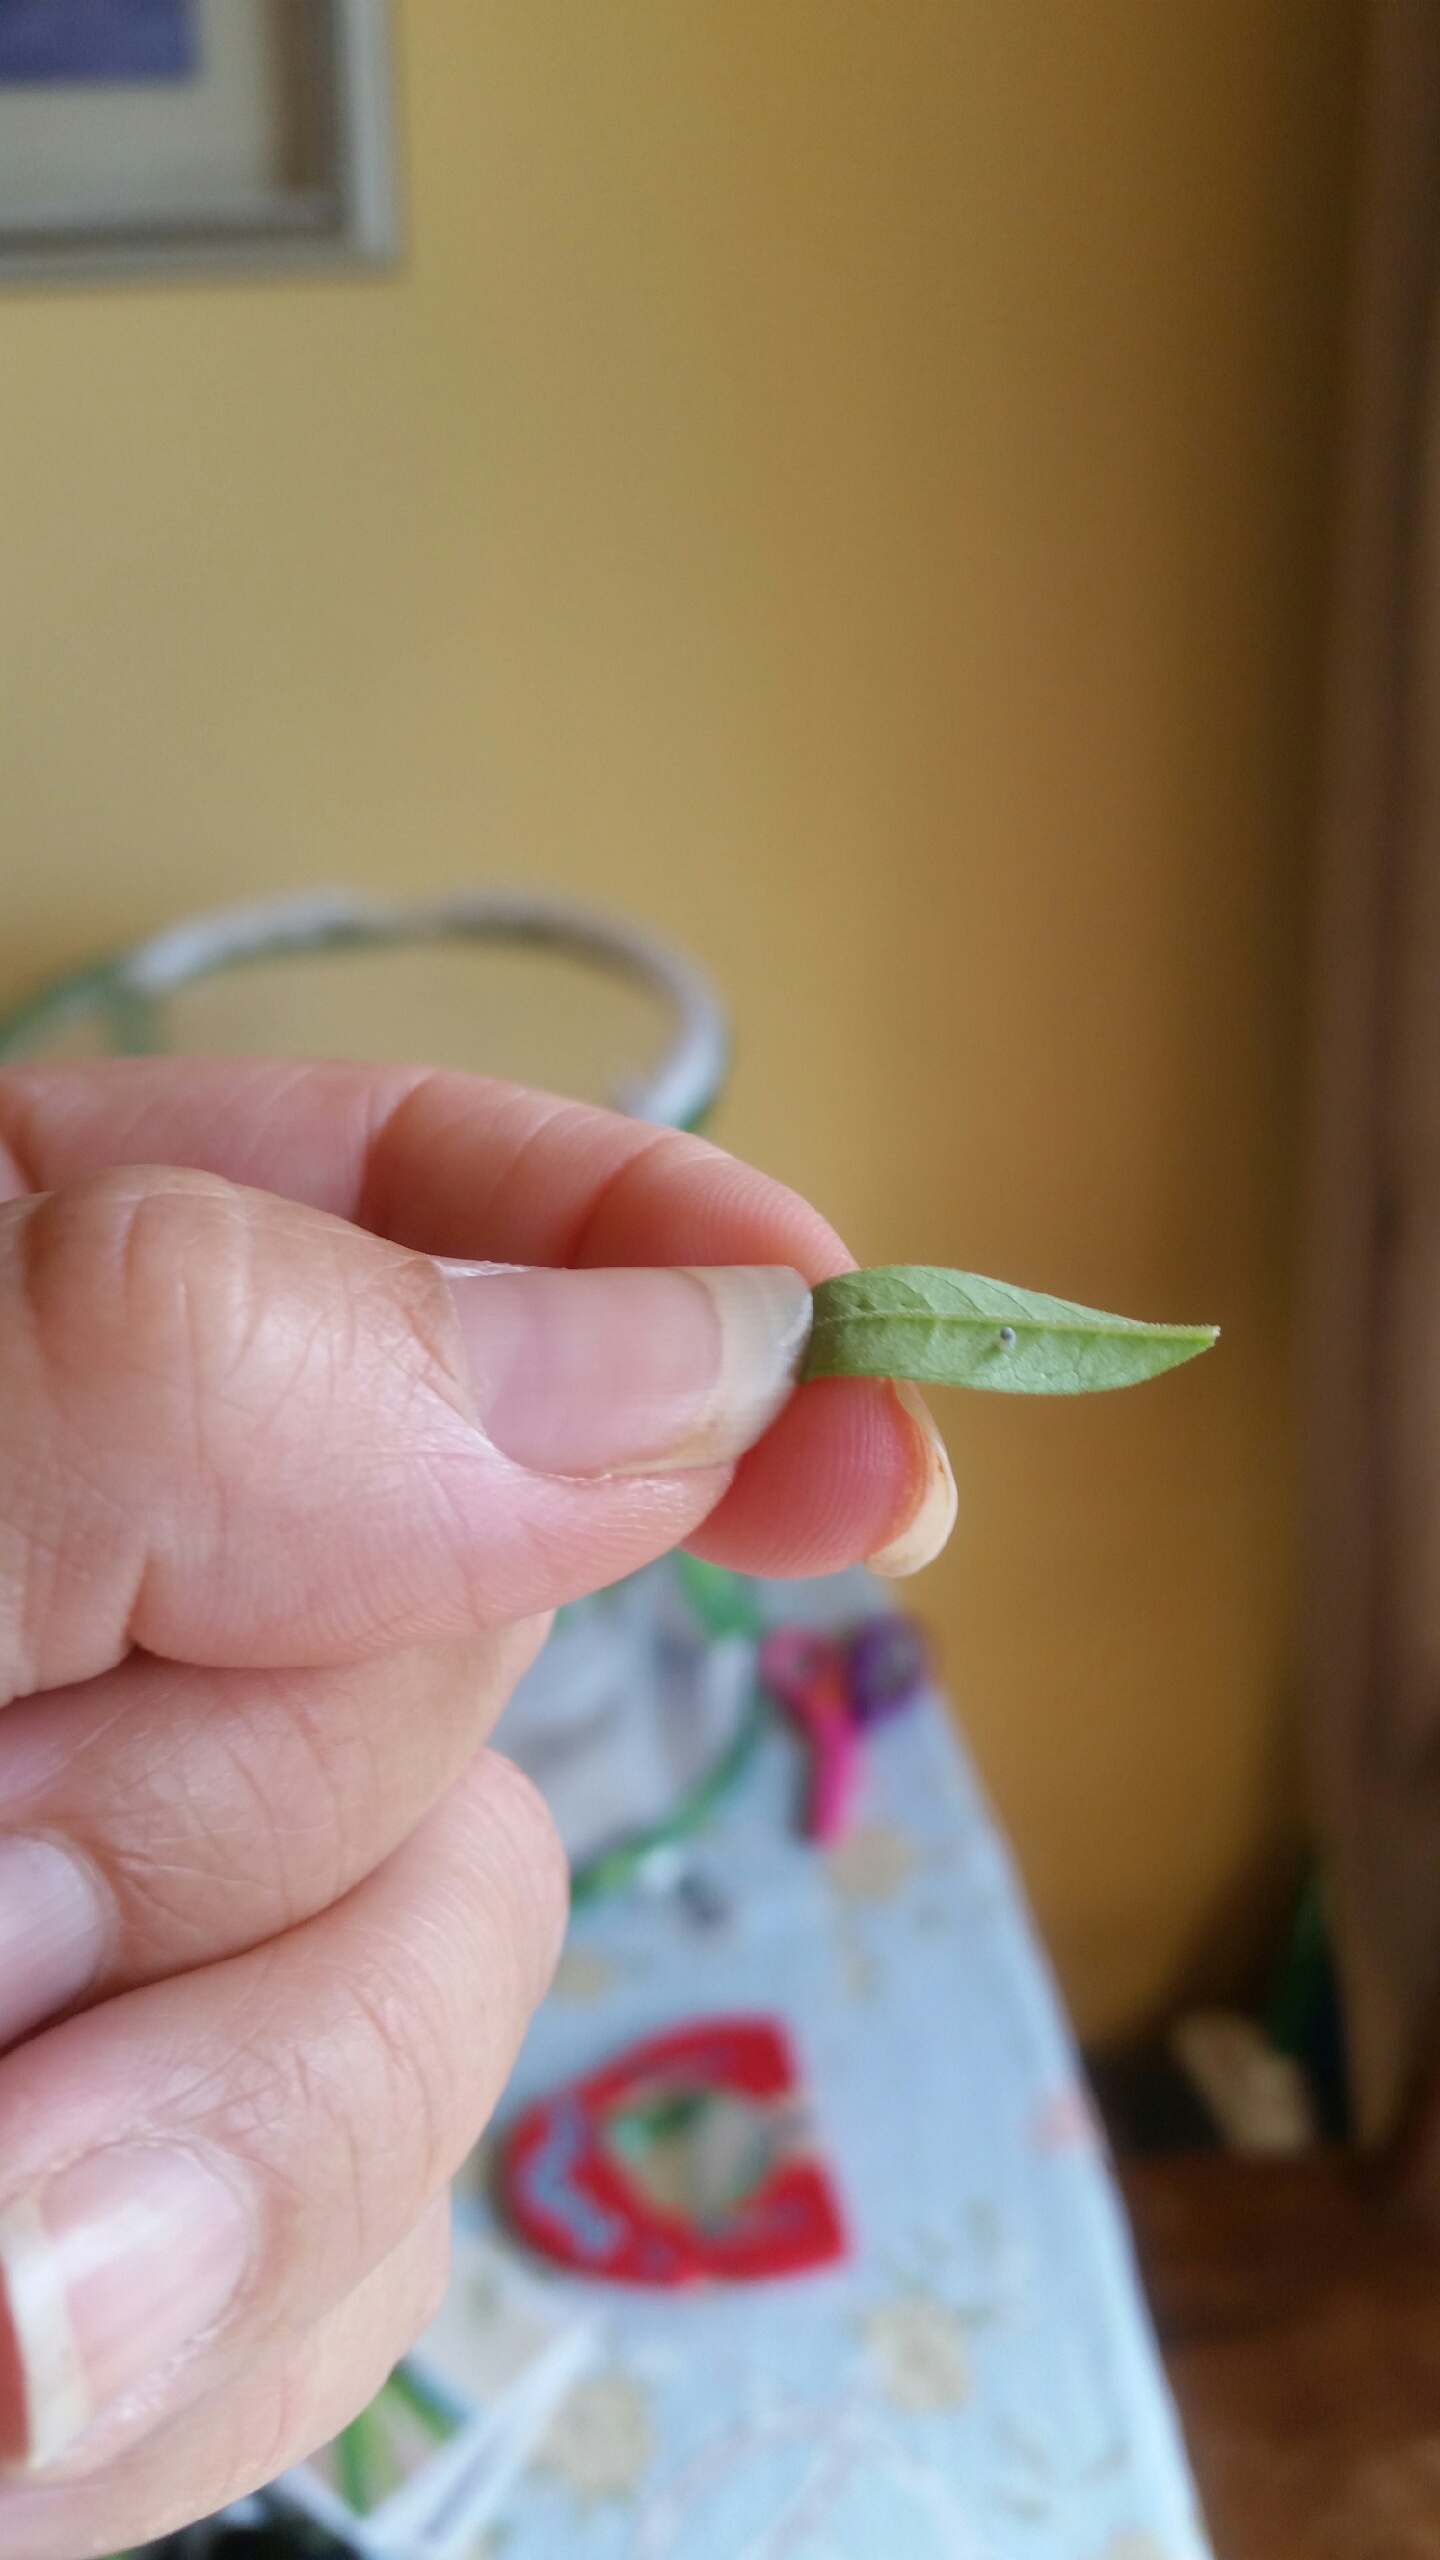
One of the coolest things about the butterfly egg is how you can tell when the caterpillar will hatch. When you see a black dot at the tip of the clear egg, you know the caterpillar will hatch within 24 hours. Like clockwork, this happened with every caterpillar and out of those tiny eggs came the tiniest little creature who right away began eating. First it ate its egg case and then moved on to the tender underside of the leaves. Then it never stopped eating.
When the tip of the tiny egg turns black, you know the caterpillar will hatch within twenty-four hours.
Our caterpillars grew quickly. And they only stopped eating to molt. It was hard to figure out if and when they were molting into a new instar (they molt five times- called instars.) The information and picture cards from the Nebraska Game & Parks were extremely helpful during this process, as well as these other resources :
Having available milkweed was NO JOKE! And the caterpillars ate a tremendous amount as they grew. We quickly went through all the young plants in our patch and then I needed to scout out (and take) milkweed from the side of the road and in abandoned parking lots. To keep the milkweed fresh, I took the the plant by the root (or the part I needed if the plant was too large) and then placed the stem through a styrofoam cup (for stability) over the top of a cut water bottle (water for plant.) Another thing to note, the tremendous amount of eating produced a tremendous amount of caterpillar waste- or frass. The butterfly habitat needed to be changed daily. Raising monarchs is a time commitment.
Hungry, hungry caterpillars!!
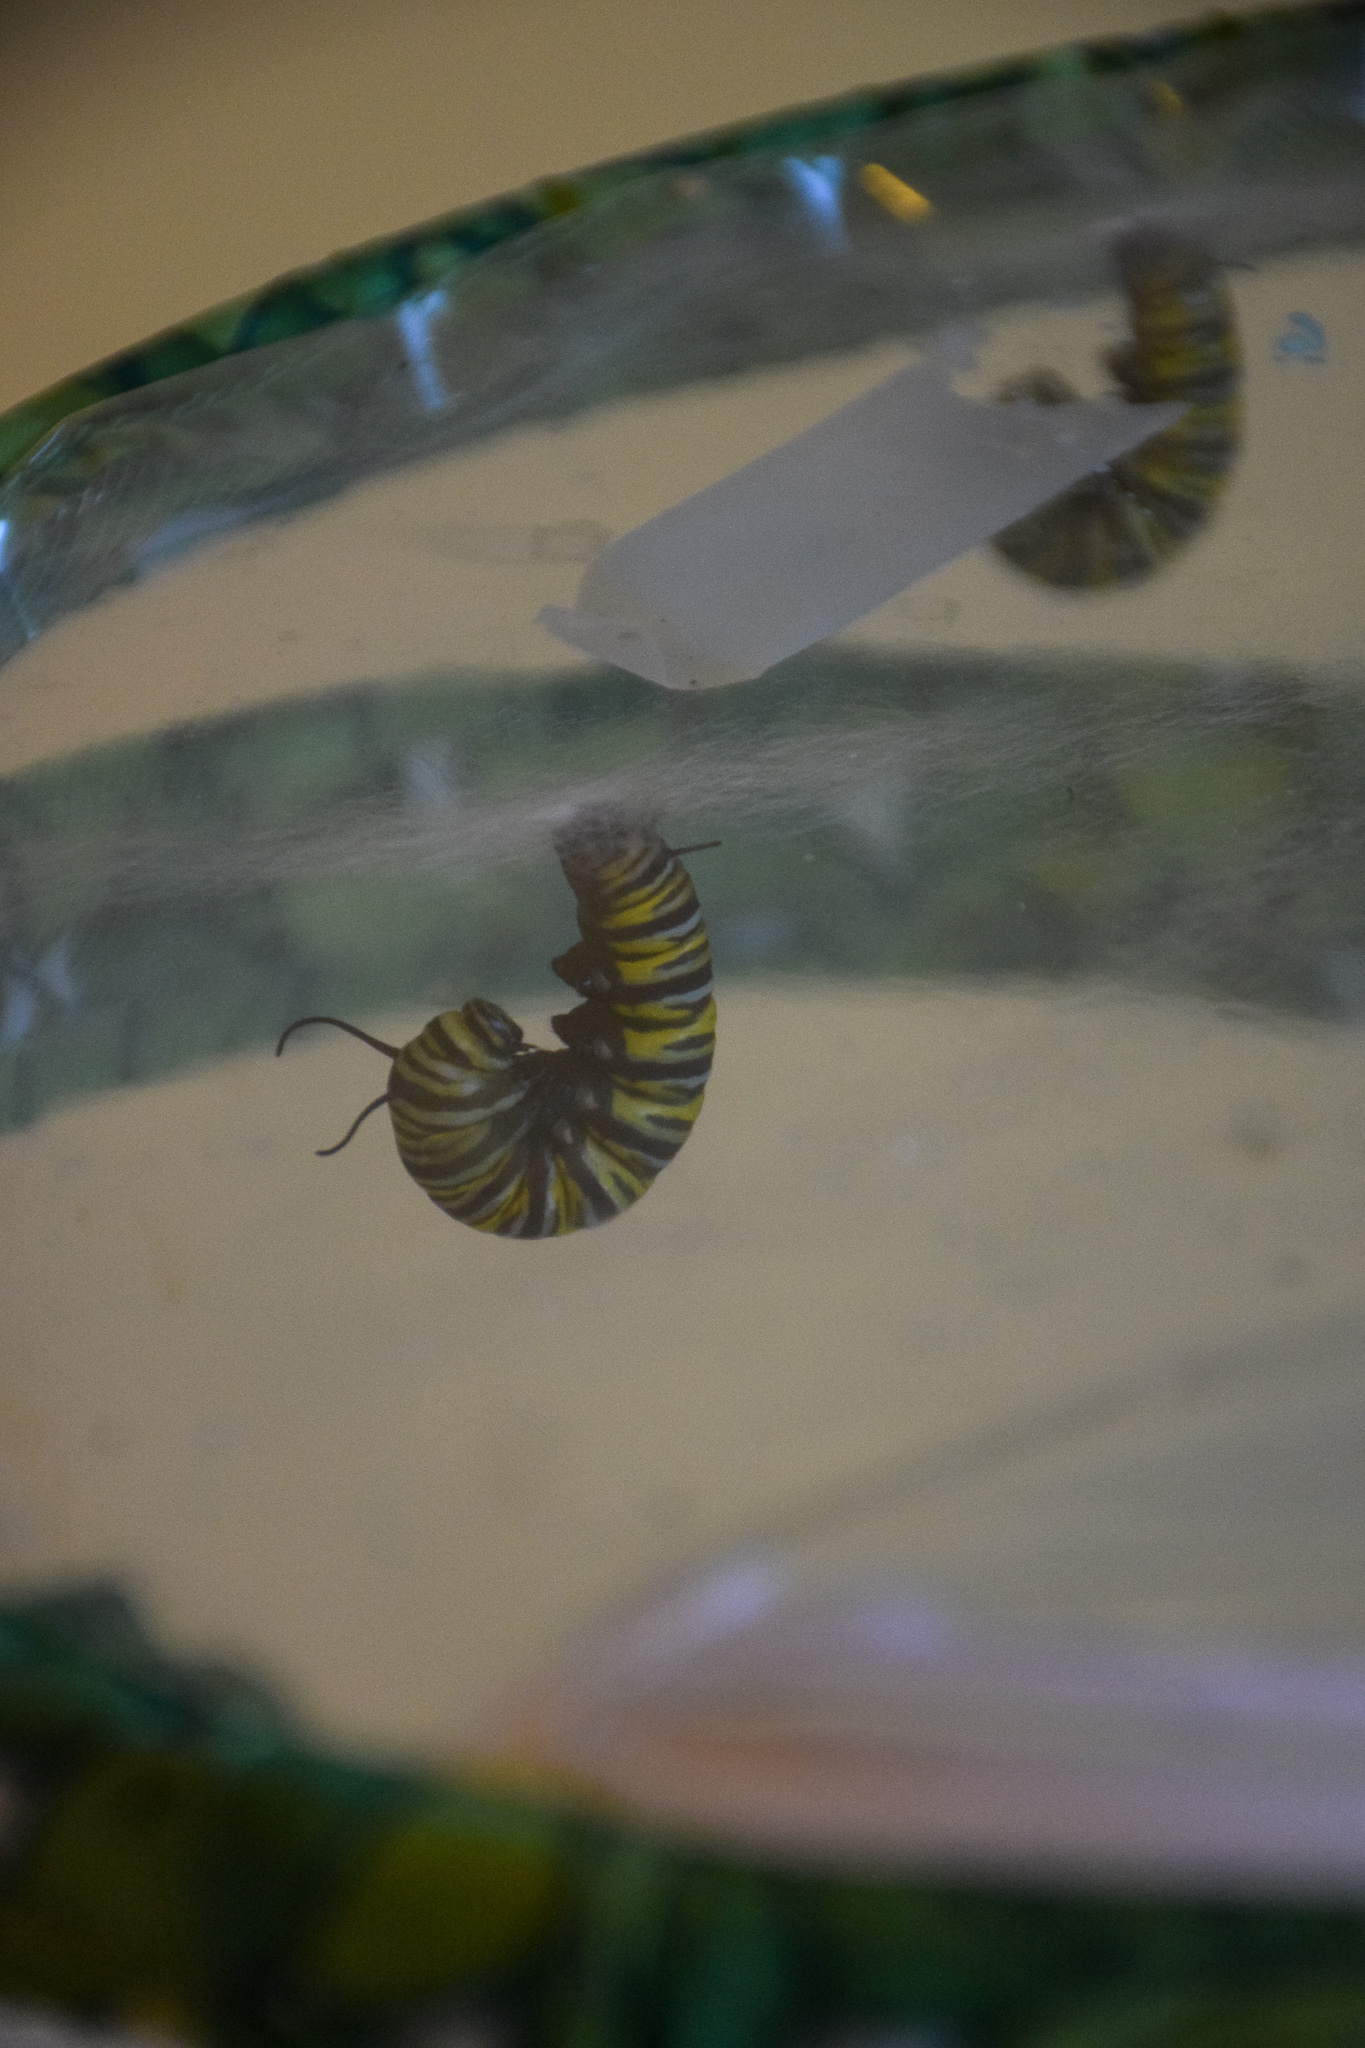
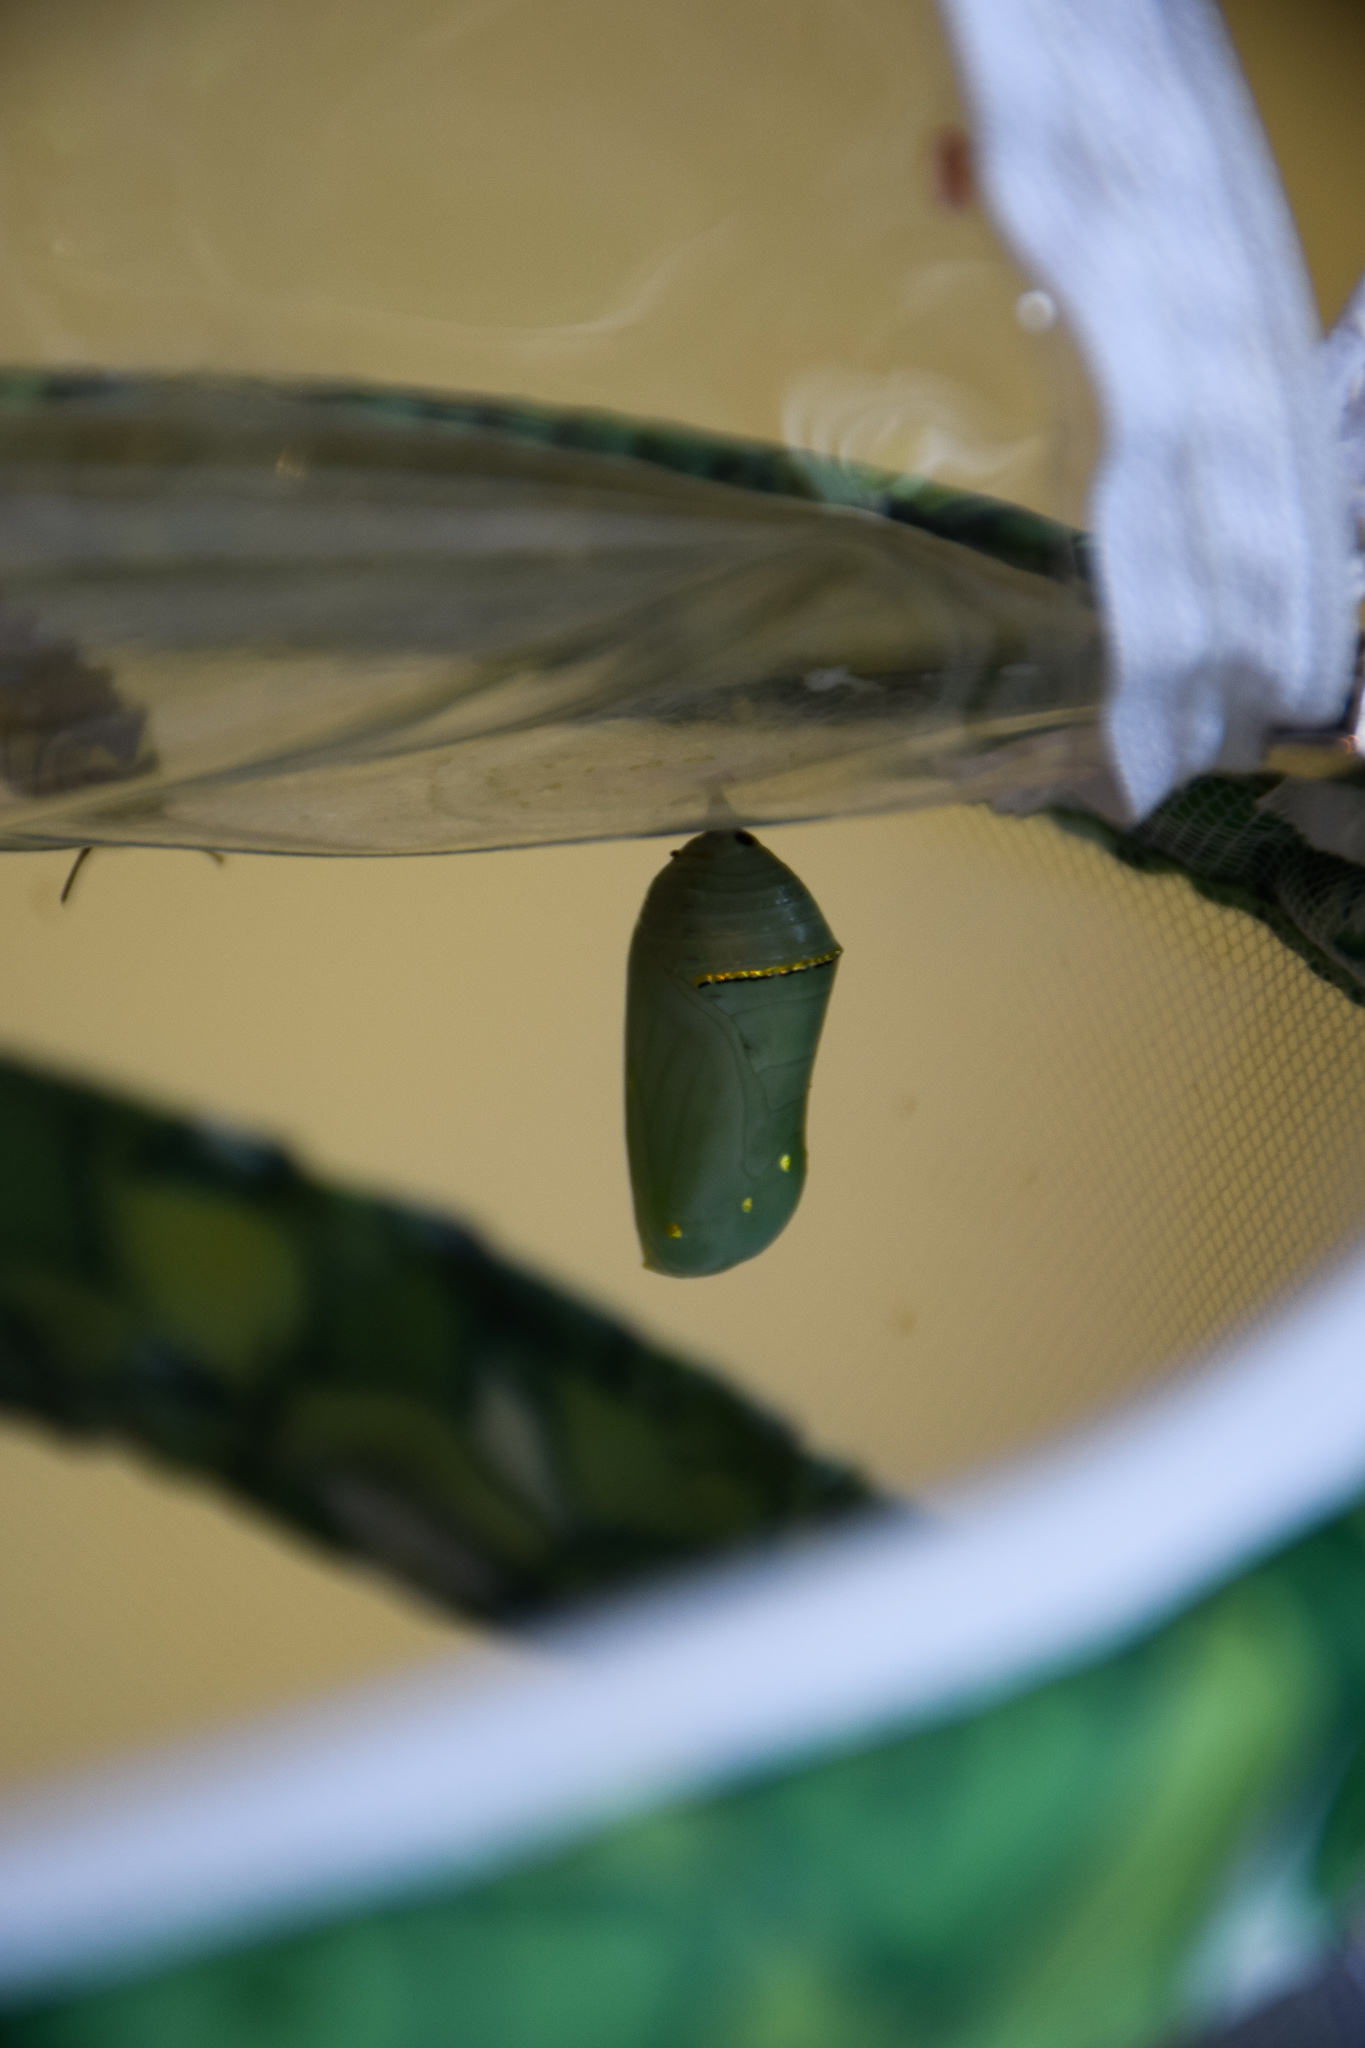
Two weeks from hatching, the now two-inch long caterpillar was ready to pupate. The clear sign of this change is when a caterpillar spins a silk “button” on the top of the habitat and hangs in a J-shape. I have to admit feeling a bit sad at this stage- all the care, all the milkweed hunting trips, all the cleaning, I knew I would not see the caterpillar in this form again. The feelings lasted only a few moments as nothing stays the same, everything changes, and when the thought of the beautiful butterfly that would emerge and we could set free, things were quickly better.
As the caterpillar pupates, it turns greenish, and basically splits, spilling its guts, and hardening into a chrysalis. There is a time lapse video at the end of the post where you can see this process from start to finish.
J-shape! Getting ready to turn into a chrysalis.
The chrysalis is a minty green color, with what looks like pure gold spots. Absolutely beautiful!
The caterpillar stays in its chrysalis for 10-14 days before miraculously emerging into beautiful butterfly. At then end of the four week process, all five of our eggs made it to adult butterflies!!
A few of our butterflies lingered on our fingers, hands, and jackets, testing our their wings before they flew away giving us the most amazing up close view of their gorgeous wings before taking flight!
Out of the five caterpillars, four were females and one was a male. Here’e a quick identification to tell the difference.
This entire experience was amazing and I am so glad to have shared it with my kids. We nature journaled each stage, sketching and creating watercolors. I had the older girls write about their experience and my Kindergartner created a book. We entered their completed work into the fair and they won Honorable Mentions. It was definitely a big time commitment but I think well worth it. And I believe we will consider doing it again next year. 🙂
BUTTERFLY BOOKSHELF:
I participate in the Amazon Services LLC Associates Program, an affiliate advertising program designed to provide a means for sites to earn advertising fees by advertising and linking to amazon.com. As an Amazon Associate, I make a small commission for purchases made through the following links.
BUTTERFLY BENEDICTION:
May the morning sun caress you, The rains of change refresh you, And the gentle breeze of His Spirit Lift the wings of your transformation.
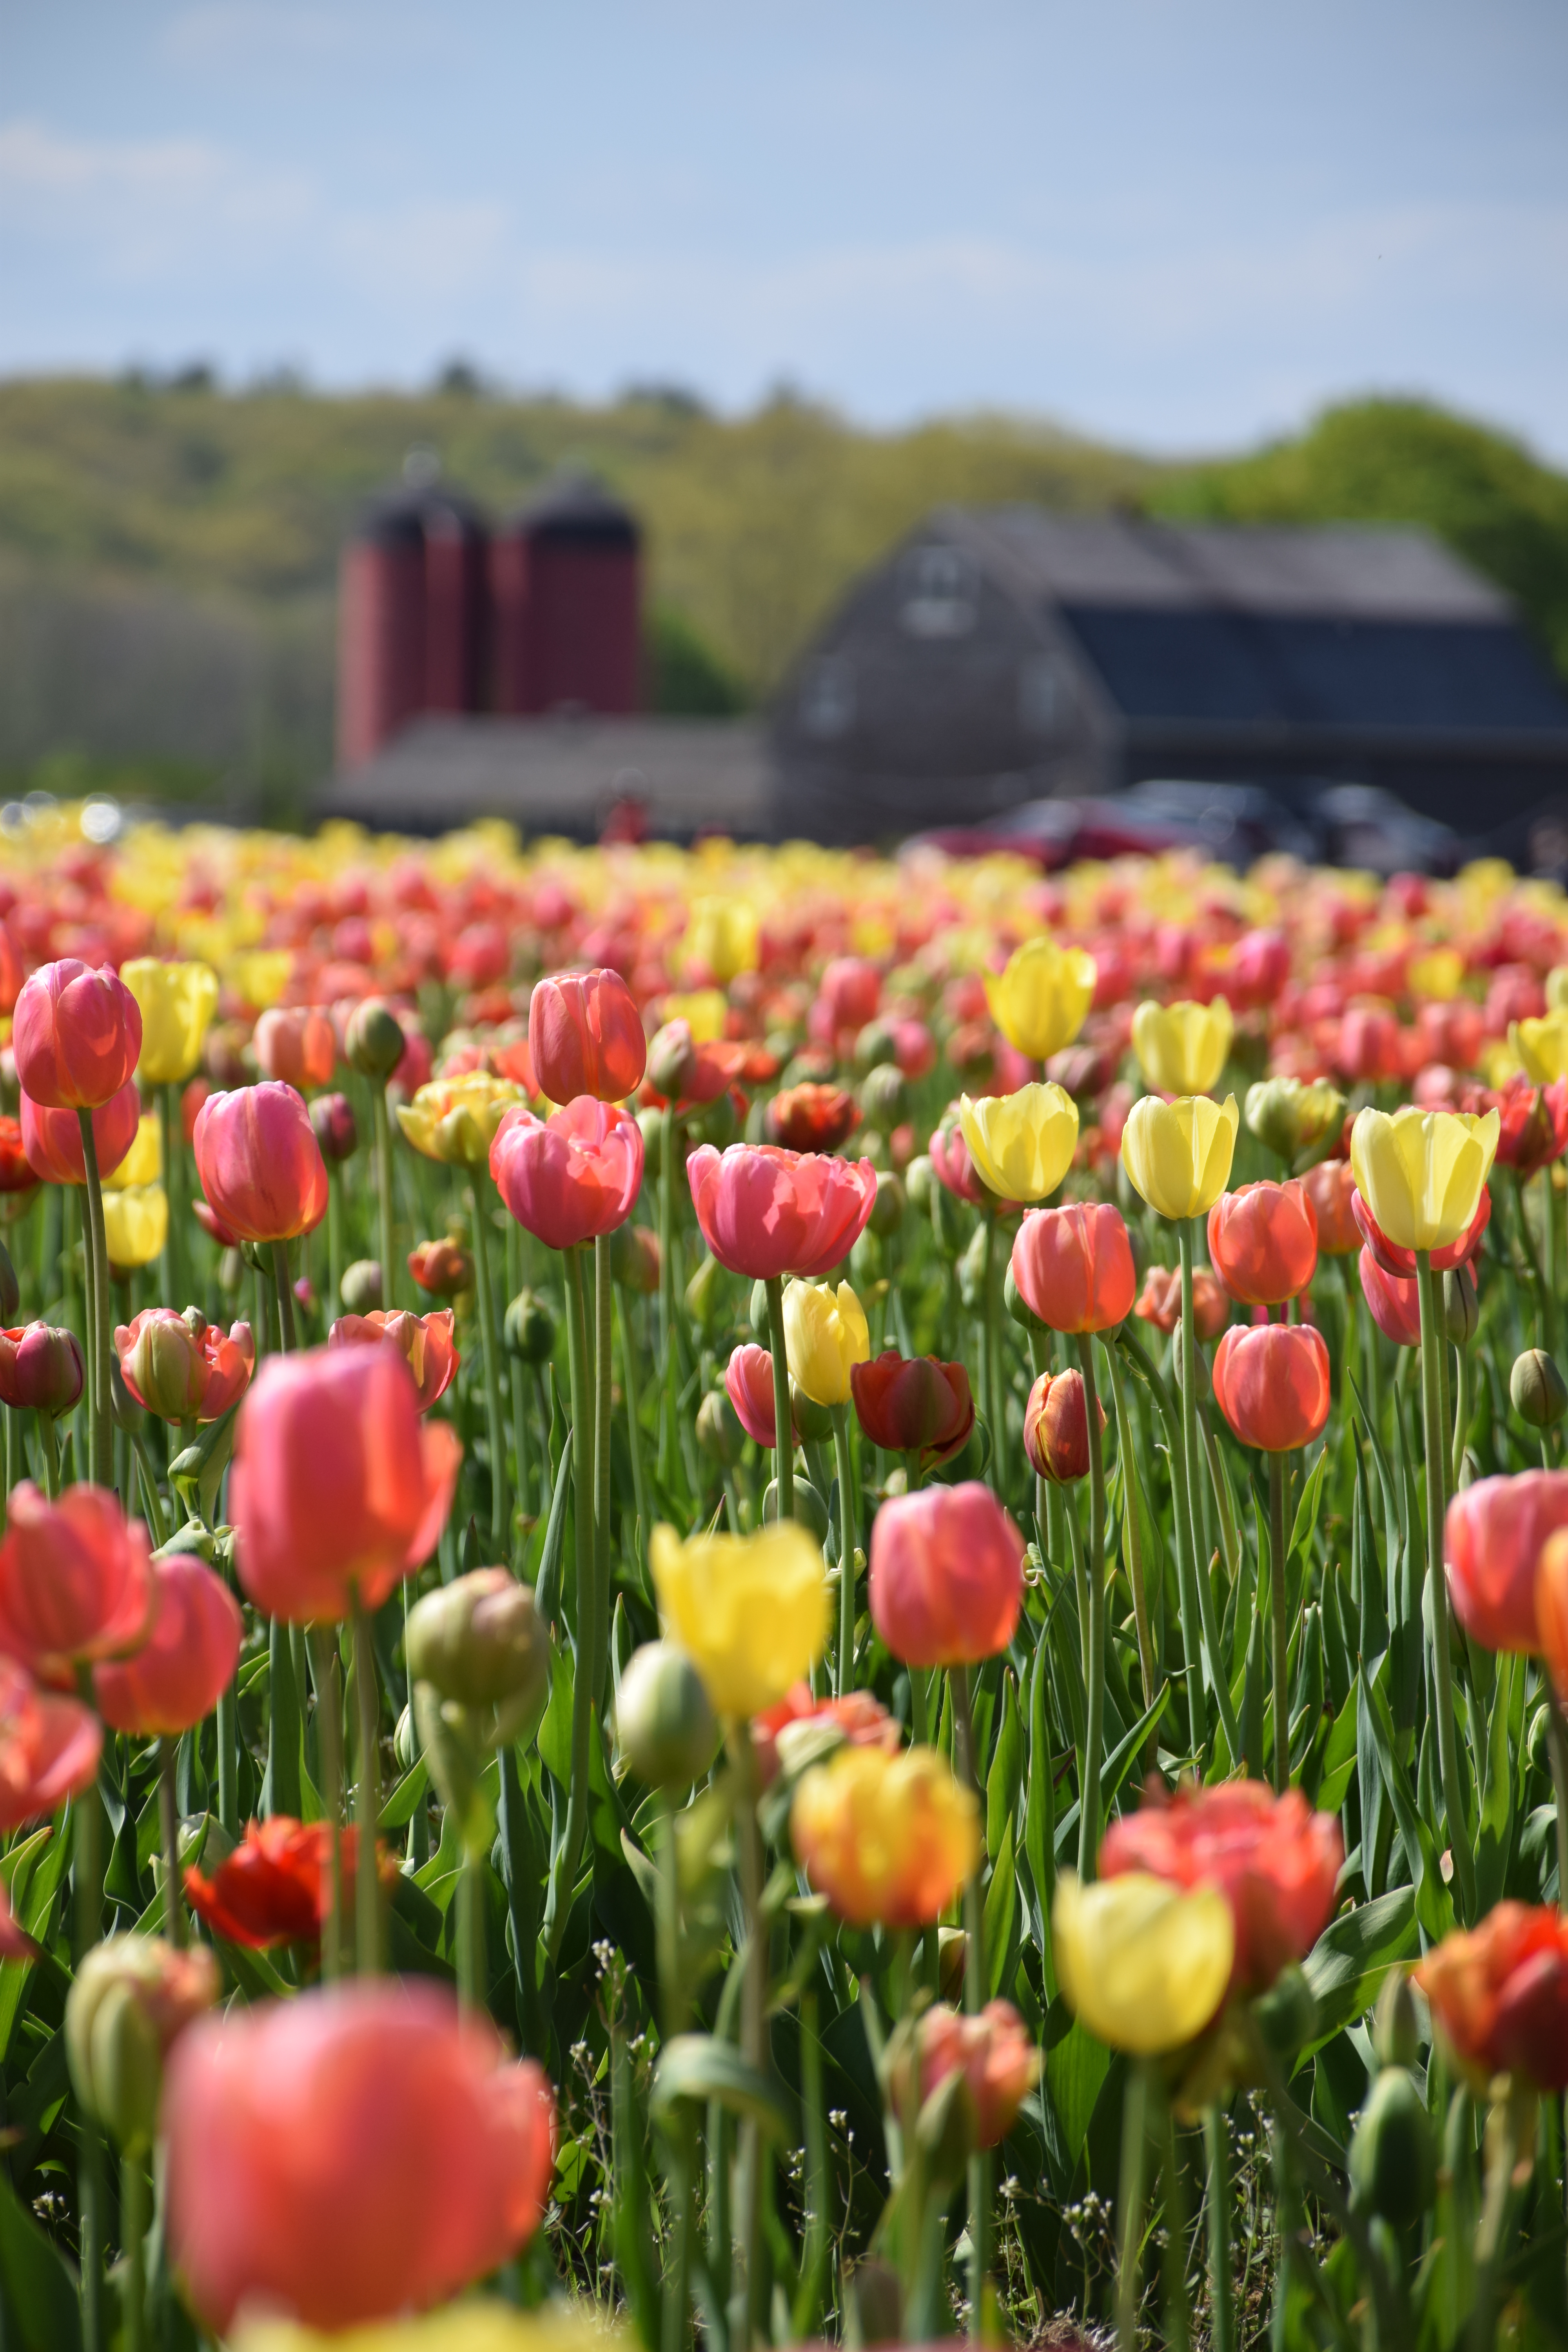
This post was inspired by a visit to Wicked Tulip Flower Farms in Johnston, RI. The farm is a special place where you can stroll along five acres of flowers and contemplate the beauty of six hundred thousand tulips in bloom.
Months ago, when the air turned crisp, when autumn leaves waved their glorious shades of red and gold, and when frost left its first icy kiss upon the earth, the soil sat and waited. It waited to receive a gift and promised to protect it through the long, harsh winter months. The gift was gently placed in the soil’s safekeeping, carefully covered with wishes and expectations, and then wooed to sleep by the comfort of its soft bed.
Above ground, the wind took a bitter turn. Leaves fell to the ground creating a patchwork quilt of shapes and colors that offered the soil extra warmth. The frost turned to layers upon layers of cold snow, frozen over by an icy glaze. In the darkness, the seed stayed anchored to the life-giving soil. Safe and snug, it rested, waited and persevered day by day through the long winter months.
When it seemed as if winter’s reign would never end, spring forced itself upon the seasonal throne. Snow began to melt and green buds appeared and unfolded in the trees. The sun warmed and kissed the earth, nudging the soil to wake the sleeping gift. The gift stirred. Out of its wrapping, a strong, green stem grew and a bud pushed its way up through the layers of darkness out into the light. It was greeted by glorious sunlight and springtime joy.
The gift enjoyed its newfound freedom. Basking in the sun, tickled by the breeze, and anchored by its strong roots, it started to uncover its full beauty. Rounded petals of vibrant colors bloomed to reveal a stunning flower of new life and hope. The flower’s cheerful color dulled the memories of the long, dark and endless winter days. Its presence captured the attention of all who walked by and compelled the busiest, most preoccupied and heavily burdened people to stop and admire its bloom.
Without using words, the flower spoke to its admirers. Its beauty reminded busy and preoccupied onlookers of the importance of slowing down and the things they may miss if they don’t. The shape of its petals and pretty little patterns in its blossom helped them remember to give attention to the little things and to enjoy each moment of the fleeting seasons. It emphasized the fact that some things in life cannot be rushed and the best things in life often take time to cultivate before they can bloom.
To the burdened people, the flower spoke of perseverance and hope. It advised them to stay anchored to the life-giving support of God and family in the darkest, harshest and most difficult seasons of life. Its bloom validated their struggles, urged them to keep pressing forward and encouraged them to not give up hope. The flower emphasized the strength and beauty that comes with breaking through the darkness into the light and pointed out that their stories of overcoming would inspire others to do the same.
For a short time, the flower stood in full strength and beauty. Its presence was a gift to every visitor and gave each admirer something different to contemplate and enjoy. Soon its blossom began to wither. One by one, its petals fell loose and danced to the ground. The soil caught and collected the petals. It welcomed the gift back to its protection and rest. The earth promised to care for the gift until next spring when the gift’s flower would make a glorious reappearance. But until then, the gift would need to rest. Rest and trust in the process and transformation of the seasons and look forward to the time when it could stand tall in the sunlight and give gifts of beautiful messages once again.
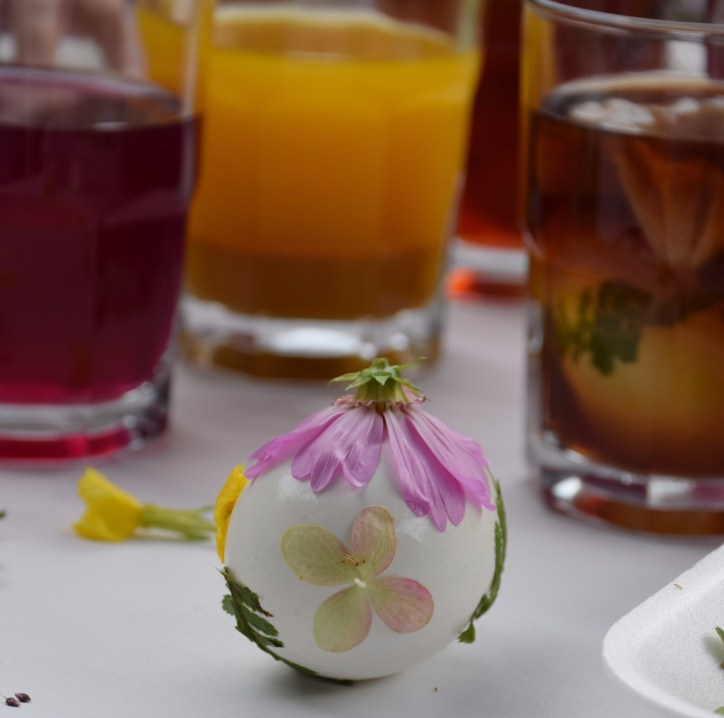
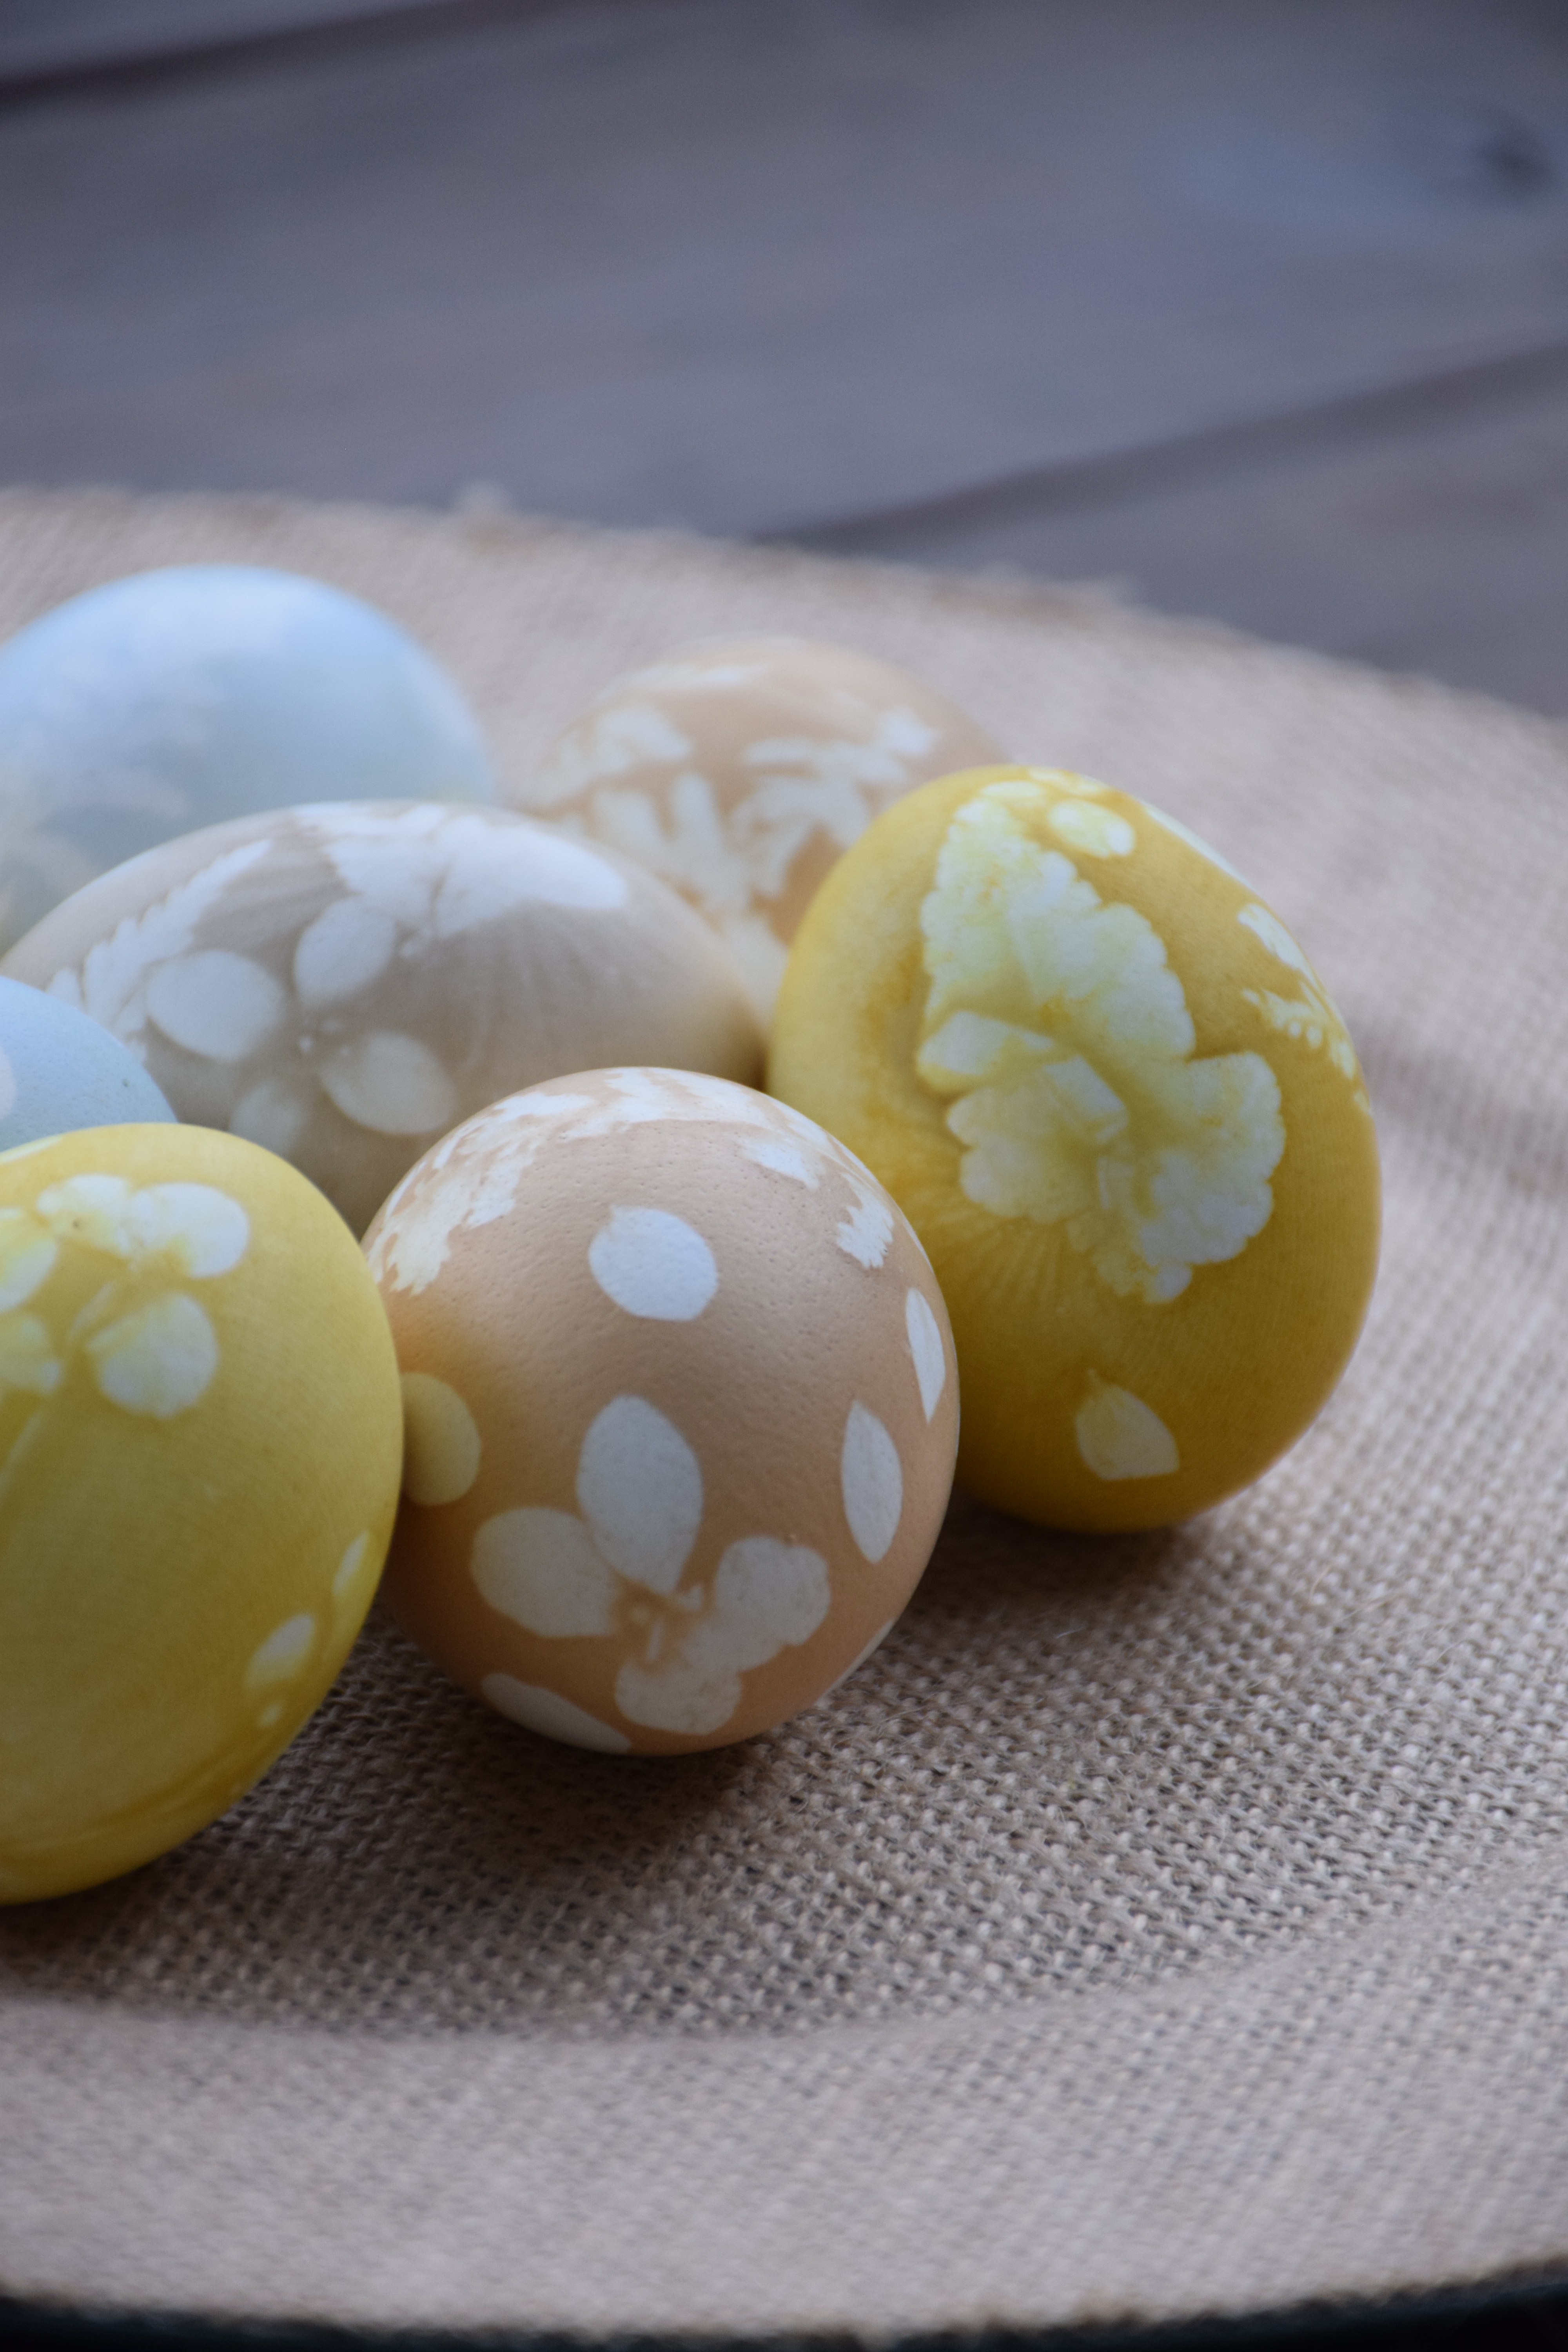
This week we are learning about Romania and I wanted to find a craft to tie into our studies. I searched online for Romanian crafts ideas and pictures of leaf print eggs caught my attention. The eggs are dyed in natural dyes (which also tied in nicely with our medieval studies) and finding the little flowers, ferns, and tiny leaves to imprint on our eggs added to this week’s nature studies. Multi-subject lessons are the best! I’m not sure how Romanian these eggs are but they were fun to make and they are absolutely beautiful.
Just a few words to keep things real, this project was time consuming. From boiling the eggs, preparing the natural dyes, patience with the egg designs and waiting for the colors to come through, and the mess (oh, the mess!! see end of post) this is not your average-throw-a-color-tablet-in-a-cup-of-vinegar-and-add-an-egg type of thing. BUT if you are adventurous and like a good creative-challenge, this project is for you!!! (And my four year old stayed with us and enjoyed the project the whole time, so if he can do it…..)
Materials:
white eggs (hardboiled)
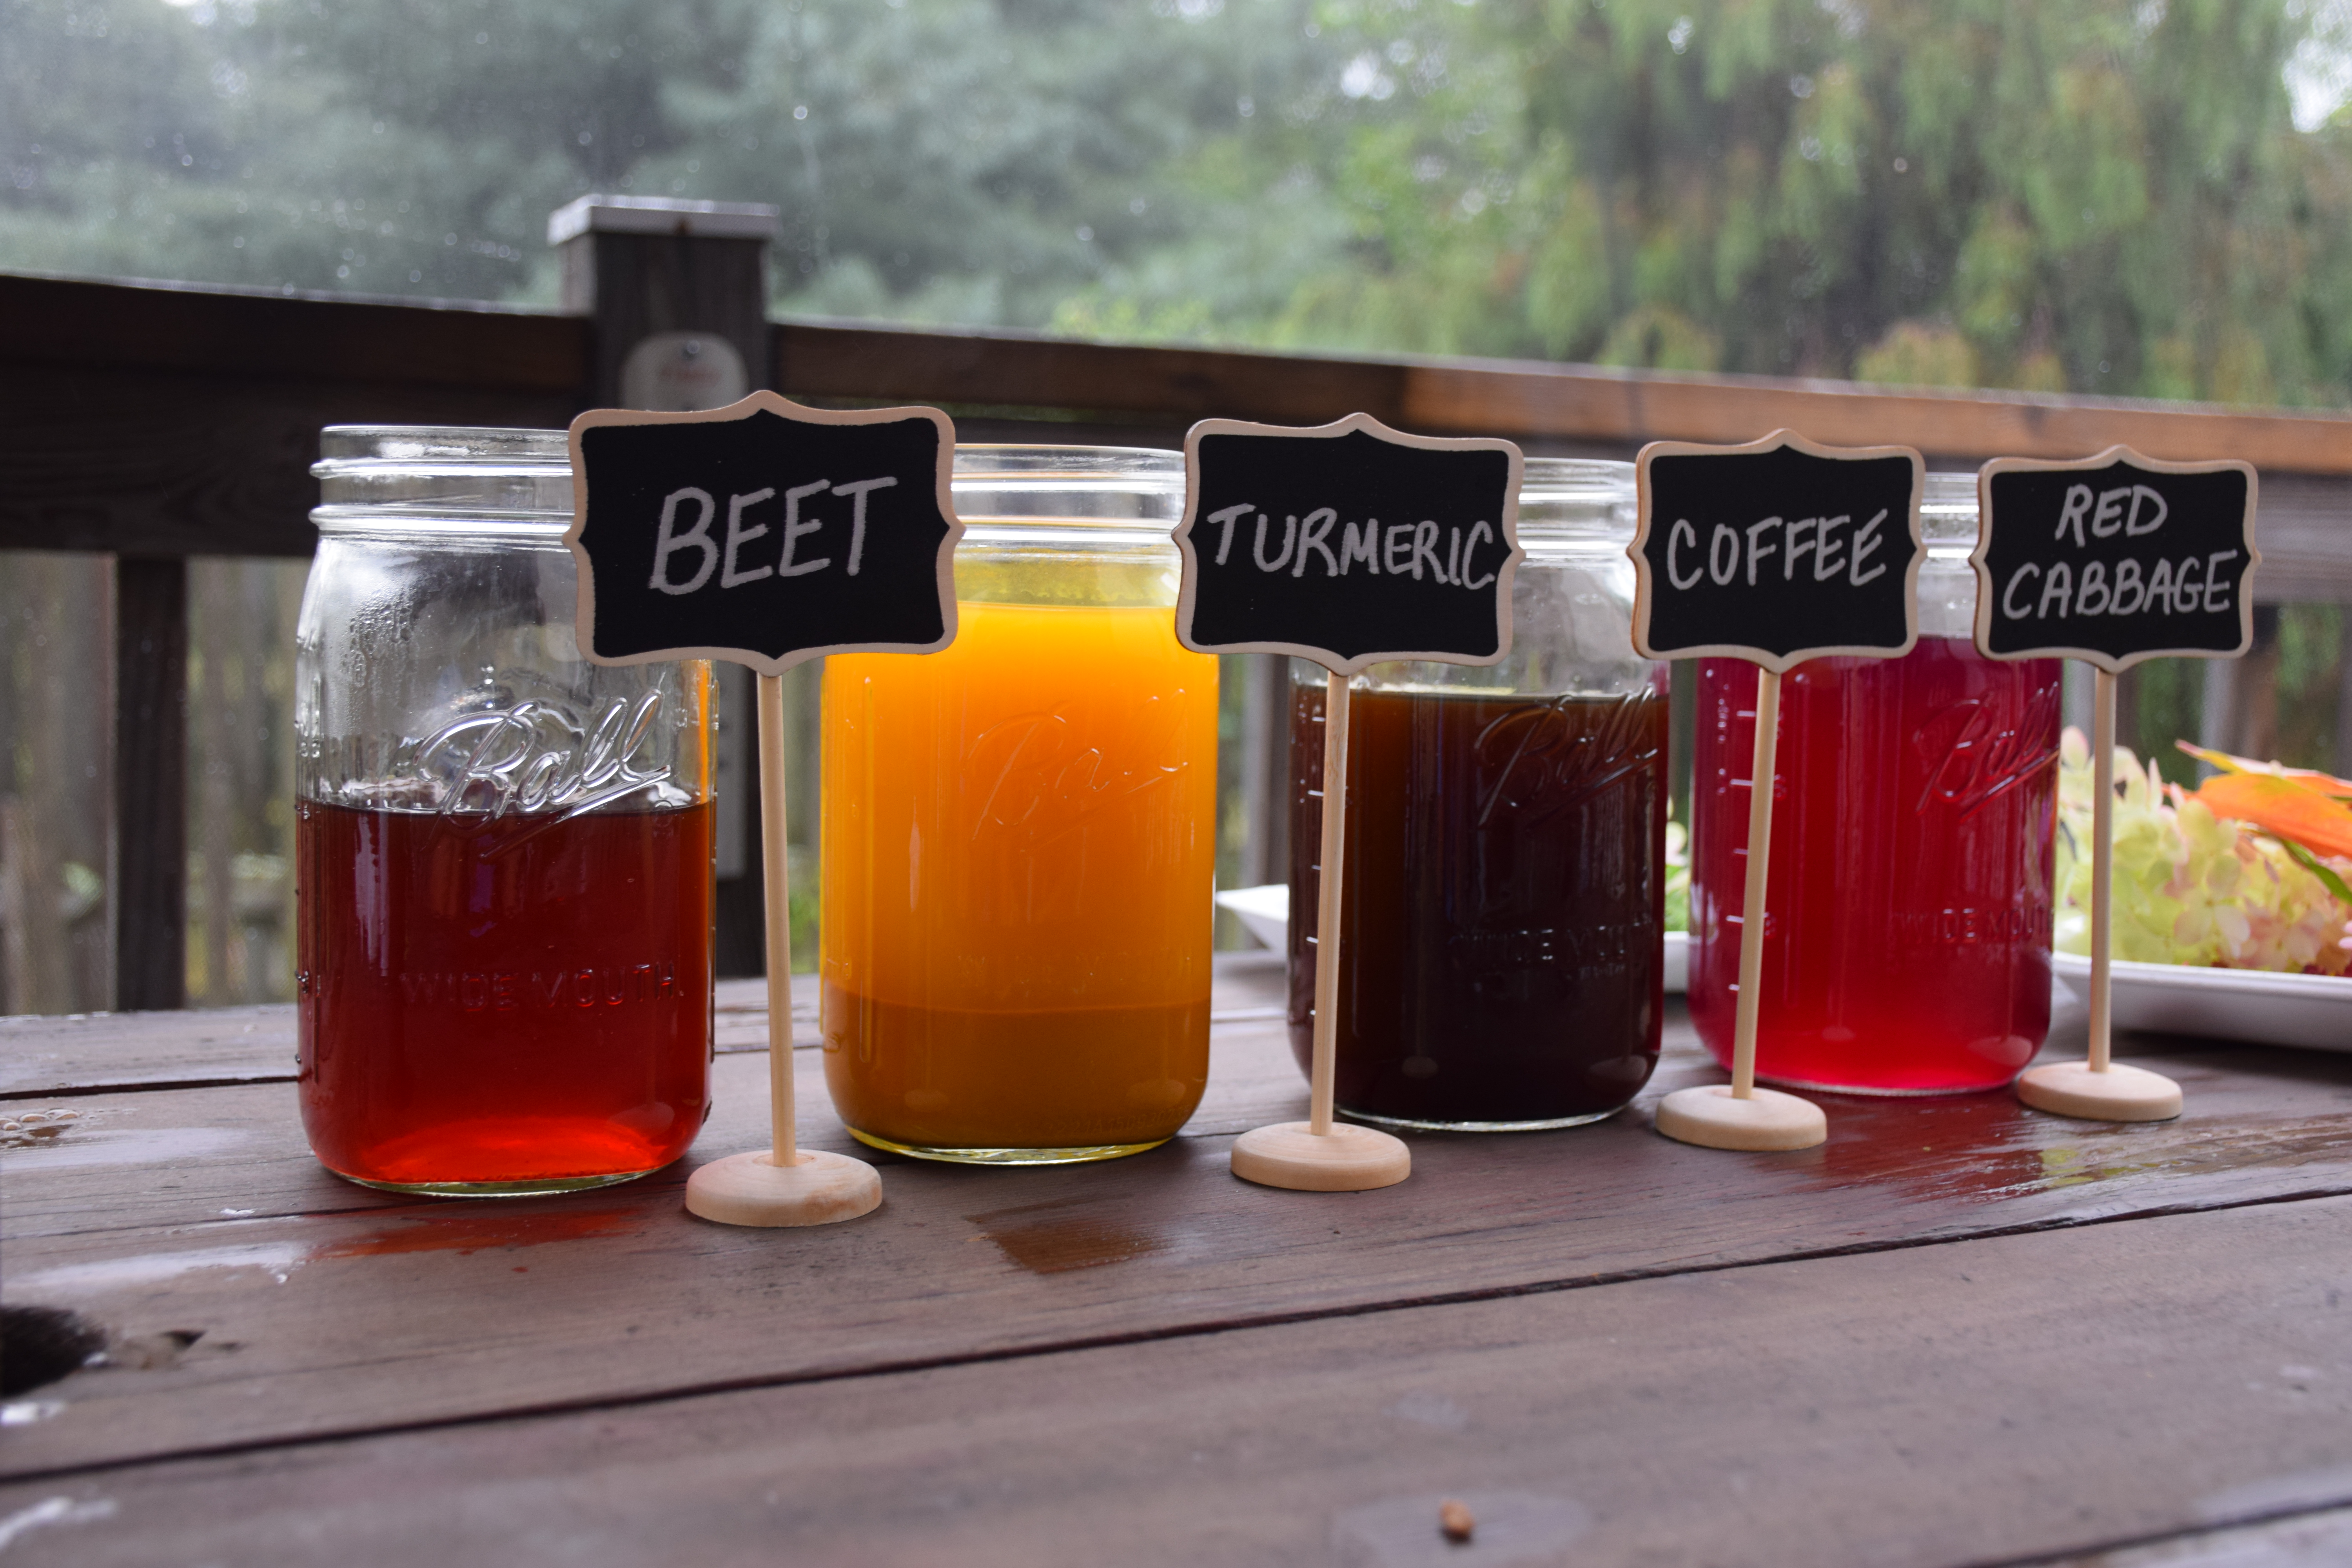
tumeric
beets
coffee
red cabbage
white vinegar
water
nylon knee highs
small hair elastics
small flowers, leaves, clovers
papertowels
Directions:
1.) Boil the eggs and keep in the refrigerator until ready to use.
2.) Search outside for small flowers, interesting leaves, ferns, and clovers. Cilantro and celery leaves would also work.
2.) Make the natural dyes. I followed Martha Stewart’s directions for dying eggs naturally.
3.) Decorate the eggs. We noticed the condensation on the eggs (from being in the refrigerator) helped the leaves and petals stick better. If the eggshells were dry, we added a little moisture to the leaves to help keep things in place. This cut down on frustration levels for those with little hands. 🙂
4.) Cover decorated egg with nylon. The foot of a knee high works great but since we only had two per package, we had to create our own “foot” with an extra small elastic. Pull nylon tightly around the egg to hold things in place.
5.) Give the eggs a natural dye bath. The longer the eggs soak, the more vibrant the color. We left the eggs in the dye for a minimum of an hour. See Martha Stewart’s directions for time and color suggestions.
6.) Cut off the nylon and peel off leaves and flowers. (We patted the egg dry with a paper towel before we cut the nylon. I am not sure if this make a difference in color but it made the eggs less slippery to work with.)