In our house, Christmas is not over until January 2. Only then is the tree allowed to come down, decorations stored away, and the Christmas music turned off until the next year. Before we say goodbye to Christmas, here are two of my favorite Christmas (playdough) recipes. They smell good enough to eat!
Candy Cane/Peppermint Playdough
1 cup all purpose flour
1/2 cup salt
2 teaspoons cream of tartar
2 teaspoons peppermint extract (more or less to your liking)
2 tablespoons vegetable oil
1 cup of water
red food coloring
white glitter
In a medium saucepan whisk together the dry ingredients. Next, mix in the water, oil, and the peppermint extract and stir until a thick batter is formed. Cook the mixture over a low/medium heat until a thick dough forms. Divide the playdough in half. Turn out the halves on parchment paper. One half leave “white” and sprinkle clear glitter over the top. Knead until smooth. Add red food coloring (we use the gel type) to the other half. Knead until smooth. Makes about 2 cups of dough.
Note: With three kids, I usually double the recipe so each one has more than enough to play with.
1 cup all purpose flour
1/2 cup salt
2 teaspoons cream of tartar
1 tablespoon ground cinnamon
2 teaspoons ground ginger
1 teaspoon ground nutmeg
1 teaspoon ground cloves
2 tablespoons vegetable oil
1 cup water
dash of orange
In a medium saucepan whisk together the dry ingredients. Next, mix in the water, oil, and the orange extract and stir until a thick batter is formed. Cook the mixture over a low/medium heat until a thick dough forms. Turn out on parchment paper and knead until smooth. Makes about 2 cups of dough.
PS I think of the gingerbread recipe as more wintry than “Christmasy” and make it all winter long.
“Unwrapping the Greatest Gift” Ornament and Craft Ideas-Days 11-15
This is Part 4 in a series of ornament/craft ideas that I think correspond with the daily advent readings from Ann Voskamp’s book “Unwrapping the Greatest Gift.” Read about Day 1-2 here , Day 3-4-5-6, and Days 7-10 here. You can find many ideas on the internet for Bible story crafts. Below are some of my original ideas and some that I modified from Pinterest. I gave credit for those craft ideas that I borrowed. If you decide to make and share one of my craft ideas, I would to love to see it. Tag me on Instagram or send me a link to your blog post.
21 “Agreed,” she replied. “Let it be as you say.”
So she sent them away, and they departed. And she tied the scarlet cord in the window. Joshua 2:21
Materials Needed:
-Red Yarn
-Optional: small hair elastic
1.)Holding one end of the yarn in your hand, wrap the yarn around your elbow (bent 90 degrees) at least 25 times. You will end up with a loop.
2.) Still holding the loop of yarn. Cut the yarn vertically to open the loop. Tie yarn at one end (or in the middle of the yarn you are still holding.
3.) Braid yarn. Tie with another piece of yarn or a small hair elastic. Look an ornament hook through the top.
16 But Ruth replied, “Don’t urge me to leave you or to turn back from you. Where you go I will go, and where you stay I will stay. Your people will be my people and your God my God.17 Where you die I will die, and there I will be buried. May the Lord deal with me, be it ever so severely, if even death separates you and me.”18 When Naomi realized that Ruth was determined to go with her, she stopped urging her. Ruth 1: 16-18
22 So Naomi returned from Moab accompanied by Ruth the Moabite, her daughter-in-law, arriving in Bethlehem as the barley harvest was beginning. Ruth 1:22
Materials Needed:
-mini gold tinsel (I found mine at Walmart)
-tape
-red satin ribbon
1.) Cut various lengths of tinsel.
2.) Bundle the tinsel to your liking and secure with tape.
3.) Wrap a satin ribbon around the middle and tie in a bow.
“7 But the Lord said to Samuel, “Do not consider his appearance or his height, for I have rejected him. The Lord does not look at the things people look at. People look at the outward appearance, but the Lord looks at the heart.” 1 Samuel 16:7
This idea came from Jesus Rolon’s blog “Crafting the Word of God.”
1.) I printed the templates (found at the link above) on card stock.
2.) Cut out all the pieces.
3.) Instead of using contact paper, I colored the heart and laminated it with my table top laminator. (Disclaimer: I tried using contact paper but t makes me all flustered. It wrinkles and bubbles and causes me undue stress! That is why I took the easy route with the laminator.)
4.) Trace the circle on the laminated paper, around the heart, and glue dotted all the pieces together.
“The people who walked in darkness have seen a great light; those who dwelt in a land of deep darkness, on them has light shone.” Isaiah 9:2
When my girls were little, I purchased a great advent resource called Truth in the Tinsel- An Advent Experience For Little Hands . Each day we read a scripture passage, created a simple craft ornament all while we talked about the scripture and the true meaning of Christmas. I loved pulling out the book and completing the activities. One year, my grandmother, mother, and sister made ornaments along with us. I still have some of the ornaments and they serve as good memories from that year. If you have little ones, this is a great resource for you. The ebook is only $7.99 and you could get started right away. Day #11 ornament idea comes from the Truth in the Tinsel and goes along with December 11th’s reading of Unwrapping the Greatest Gift.
“38 Then the fire of the Lord fell and consumed the burnt offering and the wood and the stones and the dust, and licked up the water that was in the trench.39 And when all the people saw it, they fell on their faces and said, “The Lord, he is God; the Lord, he is God.” I kings 18:38-39
1.) Stick a heart shaped sticker in the center of the ball. Carefully press around the edges to make sure sticker is sealed.
2.) Sponge fiery colors on the ball and over the heart sticker.
3.) Let dry.
4.) Peel the heart sticker away. If the paint seeped under the sticker, you can use a small amount of nail polish remover on a q-tip to remove the paint. Be careful to test the area first so it does not strip the red color.
“Unwrapping the Greatest Gift” Ornament and Craft Ideas
This is Part 3 in a series of ornament/craft ideas that I think correspond with the daily advent readings from Ann Voskamp’s book “Unwrapping the Greatest Gift.” Read about Day 1-2 here and Day 3-4-5-6 here.You can find many ideas on the internet for Bible story crafts. Below are some of my original ideas and some that I modified from Pinterest. I gave credit for those craft ideas that I borrowed. If you decide to make and share one of my craft ideas, I would to love to see it. Tag me on Instagram or send me a link to your blog post. 🙂
“After these things God tested Abraham and said to him, “Abraham!” And he said, “Here I am.”2 He said, “Take your son, your only son Isaac, whom you love, and go to the land of Moriah, and offer him there as a burnt offering on one of the mountains of which I shall tell you.” Genesis 22:1-2
Materials Needed
-mini wooden craft sticks
-colored tissue paper
-glue gun
1.) “Build” a fire with the tissue paper. Tape it in place, around the bottom, so it forms a flowery-bunch.
2.) Build the sticks around the fire, hot glue sticks in place.
“12 And he dreamed, and behold, there was a ladderset up on the earth, and the top of it reached to heaven. And behold, the angels of God were ascending and descending on it!” Genesis 28:12
Materials Needed:
-Large Craft Sticks
-Mini Craft Stick
-Wood glue or hot glue
1.) Glue sticks together to resemble a ladder.
2.) Paint the sticks. (PS I am sure when I do this craft with the kids, their ladders will be colorful, bedazzled, and might include a few angels on the steps.)
“3 Now Israel loved Joseph more than any other of his sons, because he was the son of his old age. And he made him a robe of many colors. ” Genesis 37:3
I cannot wait to do this craft with my kids. I had fun making it and the colors mixed together so beautifully.
Materials Needed:
-Coffee filter
-scissors
-paper towels
-food coloring (liquid), water
-bulb pipettes ( We have the Coloring Mixing Set from The Homegrown Preschooler The set comes with pipettes. Amazon has them too.)
1.) Fold the coffee filter in half. Cut out the shape of a long-sleeved coat.
2.) Put the coffee filter on top of a few layers of paper towels. Mix food coloring with a few drops of water. You want the colors concentrated and not watered down.
3.) Squeeze some color in the pipette and drop onto the coffee filter in a polka dotted fashion. The colors will start to run and blend into each other.
4.) When the filter is completed covered with color, allow to dry. No two coats will be the same.
“And Moses summoned all Israel and said to them, “Hear, O Israel, the statutes and the rules that I speak in your hearing today, and you shall learn them and be careful to do them.2 The Lord our God made a covenant with us in Horeb.3 Not with our fathers did the Lord make this covenant, but with us, who are all of us here alive today” Deuteronomy 5:5
Materials Needed:
-dark colored cardstock
-gray and white crayons
-skewer
1.) Pressing heavily down on a gray crayon, color over the card-stock. Repeat with the white crayon. The colors should resemble stone.
2.) Cut out the card stock to resemble two tablets.
“Unwrapping the Greatest Gift” Ornament/Craft Ideas
This is Part 2 in a series of ornament/craft ideas that I think correspond with the daily advent readings from Ann Voskamp’s book “Unwrapping the Greatest Gift.” Read about Day 1 and Day 2 ideas here. You can find many ideas on the internet for Bible story crafts. Below are some of my original ideas and some that I modified from Pinterest. I gave credit for those craft ideas that I borrowed. If you decide to make and share one of my craft ideas, I would to love to see it. Tag me on Instagram or send me a link to your blog post. 🙂
Materials Needed:
-Pipe Cleaner
-Pony Beads
-Googly Eyes
-Small piece of ribbon or paper for the tongue
1.) Create the head of the snake by curving one end of the pipe cleaner around itself a few times.
2.) Hot glue the eyes and tongue in place. Note: First, we tried using regular glue but it would not hold so we went with the hot glue gun.
3.)Bead your snake. (LESSON IDEA- You could incorporate patterns (AB, ABC. ABBA) into this part. This is a great fine motor activity. My 2- 1/2 year old beaded the green snake by himself.)
4.) Fold over the tail and then wrap on the tree.
My inspiration for this craft came from Frugal Fun for Boys. See below for link:
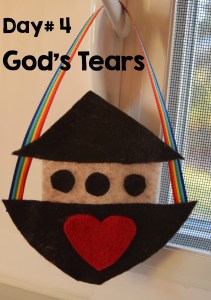
5 The Lord saw that the wickedness of man was great in the earth, and that every intention of the thoughts of his heart was only evil continually.6 And theLord regretted that he had made man on the earth, and it grieved him to his heart.7 So the Lord said, “I will blot out man whom I have created from the face of the land, man and animals and creeping things and birds of the heavens, for I am sorry that I have made them.”8 But Noah found favor in the eyes of the Lord. Genesis 6:5-8
Materials Needed:
-Felt
-Rainbow Ribbon
This craft involved a lot of cutting but once all the cutting was done, it was easy for the kids to put the shapes together to make the ark. It can double as a shape lesson too.
5 And he brought him outside and said, “Look toward heaven, and number the stars, if you are able to number them.” Then he said to him, “So shall your offspring be.” Genesis 15:5
Materials Needed:
-empty baby food jar
-flicker light
-black paper cut so it can fit snugly inside jar
-hole punch
-fabric for the cover
Using a small hole punch, punch holes in the black paper. Roll and unroll the paper a few times so that it fits snugly to the inside of the glass. Put a flicker light inside the jar. Cut a circle of black fabric to go between the top of the jar and cover. Decorate the top of the jar. Turn it on at night.
Here is a picture in the light:
The Lord visited Sarah as he had said, and the Lord did to Sarah as he had promised.2 And Sarah conceived and bore Abraham a son in his old age at the time of which God had spoken to him.3 Abraham called the name of his son who was born to him, whom Sarah bore him, Isaac.[a]4 And Abrahamcircumcised his son Isaac when he was eight days old, as God had commanded him.5 Abraham was a hundred years old when his son Isaac was born to him.6 And Sarah said, “God has made laughter for me; everyone who hears will laugh over me.”7 And she said, “Who would have said to Abraham that Sarah would nurse children? Yet I have borne him a son in his old age.” Genesis 21:1-7
Materials Needed:
-felt
This was another big cutting project but I think the ornaments turned out nicely. Lots of hearts and layering of the fabric. The hair and beard were fun to make.
The most wonderful time of the year is here. A time of anticipation, expectant waiting, and preparation for the celebration of Jesus’ birth. I cannot think of a better way to discover the treasures and gifts of this season, then with Ann Voskamp’s The Greatest Gift and Unwrapping The Greatest Gift.
God has been using these two books to speak to me and my family in many ways. Each day, it seems the devotion was written specifically for me, to meet me right where I am. I know that sounds a bit silly and impossible but it is true. The words are composed so beautifully, so descriptively, and so vividly, that they prompt my thoughts towards better things, redirect my heart to those who are hurting, and provide a salve for the hurt and broken places in my own soul. This is the season of hope, love, peace and God’s great gifts.
In The Greatest Gift, the lineage of Jesus is explored through familiar Bible stories and the colorful characters in Christ’s family tree. Each day there is a Bible passage, a devotional, and reflection questions. I love that the devotions are only a few pages long so that there is no excuse not to read them daily. The reflection questions keep me thinking ALL DAY LONG! They are not questions like- Who was Sarah and Abraham’s baby? or How many brother’s did Joseph have? They are questions that require me to search my life and the state of my heart. My favorite part of each chapter is the “Unwrapping More of His Love in this World” section. These are tangible things that a person can do to show their love to God and others by serving, blessing someone’s day, or worshiping God through letter and song.
In conjunction with reading The Greatest Gift, I have been reading Unwrapping the Greatest Gift with the kids. These stories follow the devotional but are written to engage the whole family. The illustrations are exquisite. Free, downloadable ornaments are available when you purchase the book. Last year, I had the girls color each of the ornaments as I read the story to them. This year, I wanted to up the craftiness with making our own ornaments. (We love crafts in our family!) I also wanted a more hands-on lesson illustration that a craft would provide.
You can find many ideas on the internet for Bible story crafts. Below are some of my original ideas and some that I modified from Pinterest. I gave credit for those craft ideas that I borrowed. If you decide to make and share one of my craft ideas, I would to love to see it. Tag me on Instagram or send me a link to your blog post. 🙂
“There shall come forth a shoot from the stump of Jesse, and a branch from his roots shall bear fruit. 2 And the Spirit of the Lord shall rest upon him, the Spirit of wisdom and understanding, the Spirit of counsel and might, the Spirit of knowledge and the fear of the Lord. ” Isaiah 11:1-2
Materials Needed:
-wood disc
(You can find wood discs at craft store, the Target Dollar Spot, or use some power tools and cut the discs yourself. I went the power tool route because power tools are fun! )
-skinny sharpie markers, paint
OR a pencil, a wood burner, paint
We live next to a small patch of woods and searched for the perfect dead branch to make this ornament out of. Searching for the dead branch (on a cold, damp, and dreary day) really drove home the idea as to how miraculous and impossible (for all but Jesus) is it to have life come from something dead. We talked about how Jesus is a miracle and how he goes to impossible lengths of love for us.
After the discs had been cut, we drew a shoot with a pencil, wood burned over the pencil marking and then painted the shoot bright green. This project was time consuming but the time could easily be cut down using pre cut wood discs, sharpie markers and/or paint.
In the beginning, God created the heavens and the earth. Genesis 1:1
26 Then God said, “Let us make man[a] in our image, after our likeness. And let them have dominion over the fish of the sea and over the birds of the heavens and over the livestock and over all the earth and over every creeping thing that creeps on the earth.”
27 So God created man in his own image, in the image of God he created him; male and female he created them. Genesis 1:26-27
Materials Needed:
-2-1/2″ styrofoam balls
-Mod Podge (Matte works best)
-blue and green tissue paper squares
-heart glitter paper (and heart punch)
-pipe cleaner
With paint brushes, we painted Mod Podge on the styrofoam ball and the stuck squares of blue and green tissue paper over the ball to represent the water and land. Note: Larger tissue squares work better than smaller ones. And stick the pipe cleaner in the ball prior to doing the mod podge. It creates a handle to make gluing easier.
After the whole ball was completely covered with tissue, we gave it a generous coat of Mod Podge. Once dry, we added a heart-punched, glitter heart stuck on by pop-up glue-dots. “We were created by love, for love.”
I plan to post a few craft ideas at a time. Check back to see the new ones added and follow along with the fun.


 “12 And he dreamed, and behold, there was a ladder


 Materials Needed: