
The most wonderful time of the year is here. A time of anticipation, expectant waiting, and preparation for the celebration of Jesus’ birth. One of my family’s favorite ways to be reminded of the treasures and gifts of this season is reading along with Ann Voskamp’s Unwrapping The Greatest Gift.
Last year, my girls and I crafted an ornament each day to correspond with the daily advent readings from the book. This post is the last in a series of ornament/craft ideas which I have created and collected. You can find the complete collection for Day 1-2, Day 3-4-5-6, Days 7-10, and Days 11-15 by clicking on the blue links.
There many ideas on the internet for Bible story crafts. Below are some of my original ideas, borrowed ideas, and ideas inspired by talented artists and bloggers. Credit for any borrowed idea is noted below the picture. If you decide to make and share one of my craft ideas, I would to love to see it. Tag me on Instagram or send me a link to your blog post.
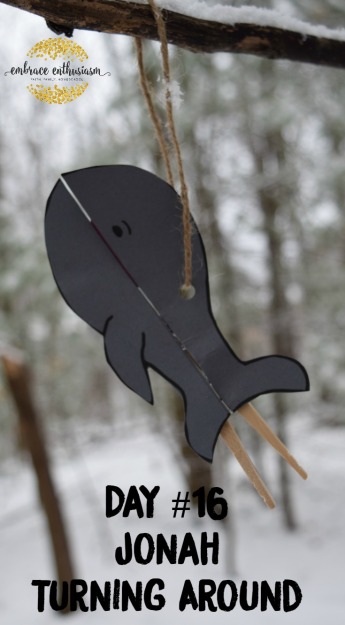

Materials: card stock, markers, scissors, glue (hot glue), clothespin
I loved this craft idea from His Wondrous Work and thought “Why not turn it into an ornament?” I printed the templates on two pieces of colored card stock (one piece skin- tone and the other gray) and then carefully cut them out. The whale needs to be sticking out beyond the clothespin so Jonah can pop out without getting stuck. Make sure you line up the whale and Jonah on the clothespin before gluing the pieces down. I had to move the whale further up the clothespin in order to make the pieces fit properly.
http://www.hiswondrousworks.com/JONAH%20and%20the%20GREAT%20FISH%20Craft.pdf

Materials: can, black card stock, twine for wrapping around the can, sand, paper-piercing tool , glue
Wash and dry a small can (I used an Old El Paso Chilies can.) Wrap and glue twine around the outside. Create a cityscape with black card stock. It took me several trials to get the right size city to fit into the can. Once I had the correct size, I used a paper-piercing tool to created the windows and doors. Using sand and glue, I made desert at the bottom of the can. Then, I folded the bottom of the city so it would stand upright and glued the city to the sand.
For added effect, hang the ornament near a small tree light to add background light.


Materials: pipe cleaners, gems, hot glue
To make the crown, I followed the directions listed at the link below. After the crown had its basic shape, we “blinged-out” our crowns with faux pearls and gems.
http://littleinspiration.com/2014/01/diy-photo-prop-crown.html

Materials: toilet paper roll, silver paint, sharpie marker, gray card stock, Stampin’ Up Dimensionals.
Paint the toilet paper roll silver. While waiting for the paint to dry, cut out the top of watchtower from gray card stock paper. Once dry, draw bricks and a door on the tower with a Sharpie or black paint pen. Put Dimensionals around the top and wrap the tower paper over the Dimensionals and around to a close. This will give the paper a small lift and make the shapes have more depth. Hole punch and string to hang.

Materials: Chalkboard paper, silver glitter gel pens or paint markers.
At back-to-school time, I had bought a chalkboard banner from Target’s dollar spot. For this ornament, I cut apart the banner and used one of the circles to write on and decorate. Super easy and cute.
Here are other craft ideas for Zechariah and Elizabeth’s story.
http://biblecraftsandactivities.com/crafts-for-zechariah-and-elizabeth/

Materials: sandal template printed on colored card stock (see link below); something to lace with (twine, small ribbon); hole punch.
For today’s reading and craft. I decided to focus on “Prepare the Way” rather than “Thunder in the Desert.” This adorable sandal craft template has easy directions to follow which are found at the link website below. The sandal is a bit large (it might fit a toddler) for what you might think of as a traditional sized ornament but in our house the bigger the better. 🙂 It is really cute and great for lacing and shoe tying practice.
http://www.jesus-without-language.net/john-the-baptist-matthew-3-make/

Materials: 1 rounded clothespin, 3 regular size popsicle sticks, 2 half-popsicle sticks, half of a pipe cleaner for halo, 1 white feather for wings, paint, glitter
Paint the top of the rounded clothespin as a head with hair. (I made the angel one-sided so the side not seen does not have to be painted perfect.) Paint the bottom half of the clothespin white. Paint all the popsicle sticks white and sprinkle glitter over them while the paint is wet. Once the paint is dry, hot glue the two longer popsicle sticks on the back of the rounded clothespin. Glue them close together but slightly angled away from each other. Glue the third popsicle stick on top of the other two, directly in the middle. Glue one “wing” (half-sized popsicle stick) on at a time. Then take the feather and hot glue into place over both of the wings. Make a small ring for a halo. Glue in place.


Materials: card stock (glittery silver, gray for the saw; brown or wood colored for handle); handsaw template (see link below), scissors and glue
I saved the image of the saw pattern found from the website below and made it smaller in a word document. I made it so two templates could fit on my page. Then I traced each part of the saw, glued it together, and punched a hole for the string. The hardest part of this craft was tracing and cutting out the teeth on the saw blade.
http://patternuniverse.com/download/saw-pattern/

Materials: white card stock, paper punches (circle and ovals), straw or raffia, brown paint
Cut the card stock into a circle. Paint hand with brown washable paint and stamp off toward the side of the circle. Add “hay” and make baby Jesus with the punched shapes. Add a cute, little face. 🙂

Materials: glittery gold scrapbook paper, fabric scrap
It’s Christmas! In consideration of Christmas day and all that comes with it, today’s craft is a very simple one. Cut a star out of the gold scrapbook paper and a red cross out of the fabric. Glue the cross on the star and hole punch.
